Desserts

Pineapple Cheesecake with Pecan Praline
Dark Sweet Cherry Cheesecake
Creamy Italian Ricotta Pie
French Apple Frangipane Tart
Tiramisu in Individual Serving Cups
        Blueberry Galette
         Pear and Amaretto Almond Frangipane Tart
        Tres Leches Cake..."Three Milks"
        Con la torta di tre latti
     Italian Version of Tres Leches Cake..."Three Milks"
     With Amaretto Cream and Amaretto Chantilly
Creamy Custards...Discussion
Banana Crème Flan  
Amaretto Flavored Flan Custard, With Amaretto Sauce  
        Dutch Apple Cake with Lemon Sauce
        Dutch Apple Cake with Lemon Sauce, Gluten & Dairy Free
        Lucia's Cream Cheese Cake
        Apricot Walnut Tart with your choice of Apricot Chantilly Cream or Apricot Cream Sauce
        Lucia's Banana Lemon Tea Bread With Lemon Sauce       
Braided Puff Pastry Apple Strudel.…Casual Sweets Made Easy
Strawberry Shortcake with Buttermilk Biscuits
Brie, Apricot Jam, and Honey Tart​​​​​​​
French Chocolate Cake
My Favorite Chocolate Cheesecake
Chocolate and Peanut Butter Cup Cheesecake
Lemon Sugar
Fluffy Buttermilk Biscuits


What kind of cupcakes would generate the biggest smile from
a best friend and loving dog owner on her birthday?

Barbara Ehrhardt surprised Clemi and her dog CJ
with these delicious treats she created.

The real CJ is on the left.


Pineapple Cheesecake with Pecan Praline
image-715711-IMG_4175.jpg
Cheesecake was inspired by a pineapple cream cheese pie mom often made.  Her recipe first appeared in an ad for Kraft's Philadelphia Brand Cream Cheese.  The pie had a pastry crust, a layer of crushed pineapple, cream cheese filling, and topped with chopped pecans
 
My cheesecake version is made in a 9-inch springform pan.  it uses a prebaked cookie crust, crushed pineapple, cheesecake filling, and a pecan praline top.
 
The praline is a common recipe.  I first found it in a magazine years ago.  Ingredients below are increased and will make much more than needed.  Guests always welcome generous amounts of praline on top.  Refrigerate extras in a sealed container, or as I do, serve praline along with drinks when company arrives.    

image-715712-IMG_4178_(3).jpg
Ingredients:
Crust
  • 2 cups of ginger snaps, animal or graham cracker crumbs
  • 5 tablespoons unsalted butter
Pineapple layer
  • 20 oz. can crushed pineapple with natural juices
  • 1/3 cup sugar
  • 1 1/2 tablespoon cornstarch
Filling
  • 2 8oz. packages of cream cheese
  • 1 cup sugar
  • 4 large eggs
  • 1/4 teaspoon salt
  • 1 teaspoon vanilla
  • 1 cup whole milk
  • Boiling water
Pecan Praline
  • 1 1/2 cup light brown sugar
  • 6 tablespoons unsalted butter
  • 1 1/2 cups coarsely chopped pecans
In a food processor, pulsate with your favorite cookie/cracker to create 2 cups of crumbs.  Process the butter with them.  Press crumbs onto the bottom and half way up the sides of a 9 inch diameter spring form pan.  Bake at 325º until just set, about 10 minutes.  Cool. 

Drain pineapple juice into a small bowl.  Add about a tablespoon of water and whisk with cornstarch. 

In a pot, stir crushed pineapple with sugar.  Fold in cornstarch mixture.  Stir over medium heat until clear and thickened.  When cooled, spread mixture over cookie crust.

Filling, in a food processer or mixer, beat cream cheese with sugar and salt until creamy.  Add eggs one at a time followed by milk and vanilla.  When well combined, slowly ladle filling over pineapple being careful to not disturb pineapple.    

Preheat oven to 400º degrees.  Seal the outside of the springform pan by wrapping the bottom and sides with 2 sheets of wide aluminum foil.  Put it into a roasting pan.  Place in the oven.  Pour boiling water in the roasting pan to about an inch and a half up the outside of the wrapped spring form pan.  After 10 minutes, lower heat to 325º.  Bake until the edges puff and the center lightly set, about 60 minutes.  Once cooled, refrigerate in the springform at least five hours or overnight. 

Praline, set oven at 325º.  Cover a cookie sheet with foil.  Melt butter in a saucepan over medium heat.  Stir in the brown sugar until melted.  When the mixture begins to boil, let it bubble without stirring for about a minute.  Coat pecans in the pot and place on the sheet covered with foil.  The mixture will boil again in about 6 minutes, throughout within 8 minutes.  Cool.   

Slide a thin knife between the cake and side of the pan to release the cheesecake; remove springform pan.  Use a baker’s spatula do the same with the bottom.  Slide the cheesecake onto a serving platter. 

When ready to serve, break praline and generously top cheesecake with pieces.  Cut and Serve.


Dark Sweet Cherry Cheesecake
This luscious cheesecake is a version of "Pineapple Cheesecake with Pecan Praline " above, substituting pineapple with sweet pitted cherries.

It’s made in a larger 10-inch spring form pan and the proportion of cherries to its cream cheese filling is increased.

Animal cracker crust option is used, volume adjusted for the larger pan. When preparing cherries for pie,

Although I usually add fresh lemon juice, vanilla extract, and butter. Because of the richness of the cheesecake filling and cookie crust, added ingredients aren’t needed. Keep it simple.

Finished cheesecake is also topped with pecan praline and is served a scoop of lightly thickened cherry sauce made with remaining frozen cherries.  Delicious.
Ingredints
Crust
  • 3 cups of animal cracker crumbs
  • 8 tablespoons unsalted butter, 1 stick
Cherry layer
  • 1 2-lb/8-oz. bag of Dark Sweet Cherries pitted, divided 1 ½ lb. and 1 lb. for sauce.
  • 1/3rd to 1/2 cup sugar
  • 1 ½ to 2 tablespoon cornstarch
Filling
  • 2 8oz. packages of cream cheese
  • 1 scant cup sugar
  • 4 large eggs
  • 1/4 teaspoon salt
  • 1 teaspoon vanilla
  • 1 cup whole milk
Praline
  • 1 1/2 cup light brown sugar
  • 6 tablespoons unsalted butter
  • 1 1/2 cups coarsely chopped pecans
Cherry Sauce
  • Remaining pound frozen cherries
  • 2-3 teaspoons corn starch
  • 1 tablespoon sugar or to taste
  • Cherry liquor, optional
Pulsate animal crackers in a food processor creating 3 cups of crumbs. Slice butter into pats and process with crumbs. Press crumbs onto the bottom and at least half way up the sides of a 10-inch diameter spring form pan. Bake at 325º until just set, about 10 minutes. When cooled, double wrap to seal the bottom and sides of the pan with aluminum foil.

Defrost 1 ½ pounds of cherries. Pour juices into a large pot. Over low heat whisk to dissolve 1 ½ tablespoons of corn starch in juices. When it begins to thicken, fold in cherries and 1/3rd cup of the sugar. Cherries will release additional juices. Stir until liquid thickens enough to coat the back of a spoon. Whisk with more corn starch if needed. Adjust for sweetness with additional sugar. Spread onto set cookie crust.

Preheat oven to 400º degrees.  Separately, boil water for bath.

For filling, blend cream cheese with sugar and salt in a food processor or with a hand mixer. Blend with eggs one at a time followed by milk and vanilla. When well combined, gently ladle filling over cherries.

Place wrapped spring-form pan into a roasting pan. Place in the oven. Add boiling water to the roasting pan to about 1 ½ inch high up the side of the aluminum wrapped springform pan. After 10 minutes, lower to 325º. Bake until the edges fluff and the center lightly set, about 60 minutes. Once cooled, tent with aluminum foil and refrigerate at least five hours or overnight.

For praline, set oven at 325º. Cover a cookie sheet with foil. Melt butter in a sauce pan over medium heat. Stir in brown sugar until melted. When the mixture begins to boil, let it bubble without stirring for about a minute. Coat pecans in the pot and place on a cookie heat covered with foil. Mixture will begin boil in about 6 minutes, boiling throughout within 8 minutes. Remove and cool to room temperature.

At least a half hour before serving, remove cheesecake from pan to serving platter. Generously top cheesecake with praline broken into pieces.

Whisk a couple of teaspoons of cornstarch to remaining defrosted cherry juice in a pot over low heat. Stir in cherries and sugar to taste. Option, add cherry liquor also to taste.  Stir in additional cornstarch if needed to create a lightly thickened sauce.

To serve, plate slices of cheesecake with scoops of cherry sauce alongside. See pictures above.


Creamy Italian Ricotta Pie 
Unique, Delicate, Incredibly Delicious...and Easy to Make! 
image-727311-IMG_4476_(3).jpg
image-727310-IMG_4564_(2).jpg
A friend gave me a copy of an old recipe for a creamy ricotta pie by Ada Boni.  According to Wikipedia, Ada Boni was one of Italy’s most famous Italian chefs and food writer (1881-1973).  Although I’ve made many versions of ricotta pies, this is my favorite.

Traditional ricotta pies are delicious but often different.  Their taste and dense textures highlight the richness of ricotta cheese.  This lighter ricotta pie is more delicate and creamier, balances between bolder ricotta and a lighter dairy cream pie. 

These pictures of the finished pie were taken at a lady’s luncheon Nancy hosted. 
   
Although the recipe uses limited ingredients, and is easy to assemble.  I added a couple of conveniences and made assumptions not spelled out in the hand-written recipe.      

As expected, the recipe includes “sfogliata”, homemade pastry crust.  Although best, I’ve had good results making it with store bought pastry.  Not specified but the recipe conveniently makes a 9’ pie. 

Candied orange peel is one of the flavors.  I’ve occasionally substituted with candied lemon, citron, and simply replaced candied orange by doubling the tablespoon of golden raisins, another ingredient. 

The original recipe specifies cooking for about 20 minutes at 400° (assumed convection) until crust is tanned; then sprinkled with confectioners’ sugar and baked for another 4 minutes.  Even with the egg wash applied, pie might needs little more initial cooking time for store bought crust to properly brown.

Here’s my modified version.  
Ingredients:
Macerate with rum
  • 1 tablespoon white seedless raisins
  • 1 tablespoon candied orange peel diced fine
  • 1 ½ tablespoon rum
Ricotta mixture
  • ¾ pound whole milk ricotta
  • 4 tablespoons sugar
  • 1 tablespoon vanilla
Thickening ingredients
  • 1 cup milk
  • 1 egg yolk
  • 1/4 cup flour
  • 2 tablespoons sugar
Pastry and egg wash
  • Pastry for top and bottom
  • 1 beaten egg
  • 2 teaspoons water
Finish
  • Confectioners’ sugar
Soak raisins and orange peel in rum for 30 minutes.

Center bottom crust on an non greased 9” Pyrex plate.  Refrigerate until ready to use.

Combine ricotta ingredients in a bowl.  Mix until smooth, a few minutes.  
Mix thickening ingredients, milk, egg yolk, flour, and sugar in a pot until smooth.  Whisk continually over low heat until mixture thickens. 

Remove from heat and combine with ricotta mixture, raisins, orange peel and rum.  When fully incorporated, place in pie shell.  Moisten edge of crust and cover with top pastry.  Roll and crimp edges.

Use a sharp knife, score top with your favorite design and pierce to allow steam to release.

Whisk egg with water.  Lightly coat dough with a pastry brush.  You will only need small amount.

Place in a 400° oven until tanned, 20 minutes or so.  Generously dust pie with confectioner’s sugar and bake for an additional 4 minutes.  Optional, continue initial cooking to desired browning then dust with powdered sugar.  Either way, make sure finished pie is richly browned.  

Refrigerate once cooled.  Remove and rest to room temperature before serving.


French Apple Ameratto Frangipane Tart

image-894951-IMG_07664575_(3)-45c48.jpg
image-894952-IMG_07684605_(2)-9bf31.jpg
image-894953-IMG_0773_(2)-e4da3.jpg

A 9-inch fluted tart pan with removeable bottom is lined with pastry, spread with almond and Amaretto frangipane, and thinly sliced apples.  Tart can be finished with an apple jelly glaze lightly charred under broiler or with an apricot glaze. 

Although the finished tart appears complex, hands on preparation is relatively quick.  Tart can be mostly assembled earlier and refrigerated.  Quality store bought pastry works well.  Frangipane is easily made with a twostep process or with a hand mixer.  Apples are cored, peeled, and sliced with the aid of a mandolin.    ​​​​​​​

Ingredients:

Crust

  • Frozen pie crust
  • 9-inch fluted tart pan with removeable bottom
  • 1 Tablespoon Butter
  •  flour for dusting

Frangipane cream

  • 1 stick unsalted butter
  • 1/2 cup sugar
  • 1 large eggs
  • 1 cup almond meal
  • 1 ½ tablespoon Amaretto Liquor
  • 1 teaspoon almond extract
  • 1 Tablespoon flour
Apples
  • 4 large Granny Smith apples
  • Granulated sugar
  • 2 tablespoons unsalted butter
  • 1 ½ tablespoons sugar

Glaze

  • ½ cup Apple Jelly
  • 1 Tablespoons water or apple liquor  

Coat fluted sides and bottom of tart pan with butter.  Lightly dust pan with flour (a small sifter works well).   Line bottom and sides with pastry dough.  Lightly press sides and trim excess to create a neat edge.  Refrigerate.

Cream butter and sugar in a food processer or mixer.  Incorporate remaining ingredients.  Coat bottom of pan with Frangipane cream.  Also refrigerate until ready to add apples.

Core and peel apples.  Slice into thin circles.  Stack vertically and cut in half.  Starting with the largest diameter, overlap slices along the periphery and into cream forming a spiral to the center.  See "Apple preparation and assembly"  below.

Brush apples with belted butter and sprinkle with sugar.  Place in the center of a preheated 375° convection oven.  Tart is cooked when the cream center is almost set when wiggled, crust is cooked, and apples’ edges are slightly charged.

Simmer apple jelly with water until smooth and thin enough to brush.  Once applied, you can slighter char under broiler.  Dust with powdered sugar and serve. 

Option, instead of apple jelly, simmer a cup of apricot preserves with 2 tablespoons of water.  Force through a strainer.  Coat tart.

         ​​​​​​​

Apple preparation and assembly… Core, peel, slice, and half apples; assemble.

image-894955-IMG_07534593_(3)-8f14e.jpg
image-894956-IMG_07564597-aab32.jpg
image-894957-IMG_0760_(2)-8f14e.jpg
image-894958-IMG_0763_(2)-8f14e.jpg


​​​​​​​Tiramisu in Individual Serving Cups
A non-traditional version
Tiramisu's core ingredient is imported Mascarpone cheese.  It's creaminess and distinctly rich flavors are unique.  Cooks will tell you American cream cheese isn't a viable substitute!  However, here is a version of tiramisu that is made with American cream cheese and is smooth, creamy and can compete with texture and taste.  Like many recipes today (including the recipe on the package of Alessi brand of imported lady fingers), they recommend a zabaglione, heating and whipping the egg mixture in a double boiler.       

Tiramisu in individual servings makes the desert table ready.  Placing the dipped lady fingers may seem a little challenging until you realize flaws are invisible; it's ok!  I also make the lady finger layers a little thicker by laying them on their side.  

Folding whipped cream into the final custard mixture helps give it the desired texture.  Using larger serving cups, shown above, has a higher ratio of custard to dipped lady fingers.  Being in individual servings keeps the custard intact.   

Tiramisu needs to be refrigerated at least 4 hours and can be made and tightly wrapped the day before. 

Although it might deviate from traditional, our New Year's Eve guests approved.  Pending the size of the cups, recipe will make at least 8 servings. 
               
Ingredients:
Coffee dip
  • 2 pods dark roasted coffee each brewed with 6 oz. cup size setting
  • 2 tablespoons rum
Cream cheese custard 
  • 6 large egg yokes
  • 3/4 cup sugar 
  • 1/2 cup heavy cream
  • 2 - 8oz packages cream cheese
  • 4oz. rum
Whipped cream
  • 1/2 cup heavy cream
  • 1 tablespoon sugar
  • 1 teaspoon rum
1 7oz. package "Biscotti Savoiardi" Lady Fingers like Alessi brand.  Note: usually found in a specialty section. 

Small bar of dark chocolate, preferably 70% cocoa for grating (bite size individual wrapped works)       
Coffee dip, pour both 6oz. cups of coffee with 2 tablespoons of rum in a flat bottomed bowl or dish.  Cool to room temperature.

Fill a large pan of water.  Place it on high heat until it reaches a simmer.  Lower heat enough to maintain a low simmer. 

Custard, cream the egg yolks and 3/4 cups of sugar in a stainless steel mixing bowl with an electric mixer until thick.  Stir in the 1/2 cup of the heavy cream.  Place the bowl over the simmering water and moderately beat until the mixture reaches a safe 160º temperature.

Remove from the heat and transfer contents to another bowl.  Cool to room temperature.  Add the 4 tablespoons of rum and both 8oz packages of cream cheese.  Beat on low until well combined.  Increase speed to high and beat until thick, about 4 minutes.  Refrigerate bowl.   

For whipped cream, place 1/2 cup of heavy cream, 1 tablespoon sugar, and teaspoon of rum into a chilled bowl.  Mix at high speed until firm peaks form. 

Fold whipped cream into the cream cheese custard.

To assemble, break lady fingers to size and very quickly dip them one at a time into coffee mixture.  Cover the bottom and each serving cup with a thick layer, edges down.  Don't worry if sloppy, they will be hidden.

Fill the cream cheese custard half way up the sides of the cups.  Make the second layer of cut and quickly dipped lady fingers the same as the bottom.  When entirely covered, add remaining custard either to the tops of the cups or to equal heights.

Give the top of each a dusting of grated chocolate.  Cover them with plastic wrap and refrigerate for at least 4 hours.    


Blueberry Galette
Fruit Galette made with free formed pastry is fun and simple to make.  Finished, they have an engaging rustic appeal.  Almost any fruit, berries, apples, peaches, plums, figs, etc. can be used.  They are usually sweetened with sugar, honey, fruit syrups; thickened with flours, corn starch, tapioca, etc.  Like fruit pies, everyone has their favorite spices and seasonings.  Fillings are often dotted with butter and their crust brushed with wash before cooking.    
Usually cooked on a greased cookie sheet or a sheet topped with parchment, I prefer replacing parchment with nonstick aluminum foil.  It offers a couple additional advantages. 

As pastry dough is hand formed in bowl shape and filled, pastry is pulled partly over the filling and pleated while pinching to secure fruit inside (bottom right photo).  Aluminum foil is agile and strong.  It is perfect to gently crumple and form around the pastry giving the Galette’s signature pastry bowl additional structure.  

Not only better support for the Galette, but helps capture any hot spills that would burn on an unprotected cookie sheet.  The picture shows a Galette that did spill and you can see the wonderful results. 

Another surprise, this Galette was made with frozen wild blueberries.  When my sons were young, we would pick wild blueberries in the woods near our home in New Hampshire.  Wild berries are much smaller then cultivated and blueberry flavors more concentrated.   I always have some frozen on hand for deserts and smoothies. 

When cooking, please make sure filling bubbles in the center before your Galette is removed from the oven.  That activates thickeners. 
Ingredients:
  • 1 Frozen single 9” pie crust
  • 1 small lemon
  • Scant 4 cups frozen blueberries
  • ¾ Cups granulated sugar
  • 3 Tablespoons corn starch
  • ¼ teaspoon ground cinnamon
  • Pinch salt
  • Butter
  • One egg white beaten with a tablespoon water (optional)   
Defrost dough and refrigerate until ready to use.  Place partially frozen berries in a bowl.  Chilled are easier to work with. Mix a teaspoon of lemon zest and a tablespoon of lemon juice with the blueberries. 

In a separate bowl combine remaining zest with all other dry ingredients.  Thoroughly mix contents with the blueberries. 

Place foil on the center of a cookie sheet, nonstick side up.  Top with pastry.

Pile blueberries onto the center.  When most are added pull pastry up the sides all around while pleating pastry and hugging the berries.  Meanwhile crumple aluminum foil as needed around and against pastry as additional support.  Add remaining berries while continuing to squeeze pastry and foil against the filling.  Dot berries with butter.  Refrigerate until oven is preheated to 375° degrees. 

Just before placing in the oven, lightly brush pastry with wash (optional).

Place tray in the center of the oven, rotating when half way cooked and occasionally after.  Galette will be ready when the center is bubbling, in about 1 hour and 15 minutes (if berries are frozen when assembled) or about an hour if not). 


Pear and Amaretto Almond Frangipane Tart
This is a classic tart is made with poached pears and almond frangipane. Although impressive, it is less intimidating than it looks, but it does require specific steps and time. Pastry crust is fitted, almond Frangipane spread, and poached pears decoratively staged on top. During baking, Frangipani puffs hugging the pears.

Frangipane is a versatile sweet filling. Proportions may vary, but core ingredients, lots of butter, sugar, almond meal, egg, and flavorings like almond extract, rum, vanilla, Amaretto liquor, orange rind, juice, and liquor, are mostly universal. Almond meal/flour is now readily available in grocery stores and reasonably priced.

Day before assembly, pears are pealed, simmered until softened in a mixture of sparkling wine and added flavors. Pears are soaked, macerated overnight in a condensed mixture. For final assembly, they are halved, cores removed and sliced.

Recipe below accommodates an 11” or 12” fluted tart pan with removable bottom.

Crust, although homemade adds extra flavor and texture, store bought is acceptable. However, packages of popular refrigerated crust come with two crusts; 9” top and bottom. Below is my favorite technique to fit larger pies, tarts and different shapes using both crusts.

It’s not totally clear whether Frangipane originated in Italy or France. One source suggests Frangipane cream was invented by an Italian named Frangipani. He lived in Paris at the time of Louis XIII. Among the flavors often used is Amaretto liquor, originated in Saronno, Italy.

Although I’ve personalized the recipe, I was first introduced to Pear Frangipane by Martha Stewart years ago in her wonderful 1985 paperback, “Pies&Tarts”. That’s where I learned to poach pears and her sequence for making this wonderful desert. Still inspiring. Thank you.

Ingredients:
Pears
  • 5 or 6 crisp pears like Bartlett green or red), or Starkrimson
  • 750ml bottle of dry champagne or sparkling white wine
  • Juice and grated rind from 1 lemon
  • 1 cup granulated sugar
  • 1 teaspoon vanilla
  • Cinnamon stick
Pie Crust
  • 1 package, 2- 9” refrigerated pie crust i.e. Pillsbury™
Frangipane cream
  • 2 sticks unsalted butter
  • 1 cup sugar
  • 2 large eggs
  • 2 cups almond meal
  • 3 tablespoons Amaretto Liquor
  • 2 teaspoons almond extract
  • 1 tablespoon flour
Peel pears and set aside.

Combine poaching ingredients in a pot. Heat to a simmer while stirring. Add pears. Simmer and occassionally rotate pears; ready when just softened through. Test with a kitchen folk. Remove pears to a bowl.

Rapidly boil poaching mixture until reduced to about half. Pour into bowl with pears and refrigerate overnight.

When ready to assemble, lightly coat tart pan with cooking spray. Using the double crust technique below, roll pie crusts to fit larger tart pan.  Cover bottom and sides with pie crust and trim fluted top edge with a sharp knife. Refrigerate until ready to spread Frangipane.

Use an electric hand mixer or food processor to cream butter with sugar until fluffy. Add  remaining ingredients and mix well.  Frangipane will thicken. 

Using a flexible spatula (I like rubber), smooth filling evenly over crust. Refrigerate again.

Cut pears in half lengthwise. Using a small knife, remove core, elongated stem, and fuzzy end. Slice pears across their width the length of each pear every quarter inch. Handle pears carefully to keep intact.

Remove chilled tart from refrigerator. Using a long narrow spatula, slide under pear, lift and stage each half on top with butt end against sides.  See picture.  Fan slices down towards center of tart.

Place tart in the lower third of oven, 350° convection.  Tart is ready when cooked through and top is tanned, about 40 minutes. Adjust temperature or oven height if needed.

Meanwhile, boil poaching liquid until it thickens into a glaze. Right out of the oven, brush tart with glaze. Dust with powdered sugar and serve at room temperature.
My favorite technique using two 9" store bought pastry crusts to accommodate larger tart, pie, or irregular shaped pans
  •    
    1. Place first crust on a floured surface 
    2. Lightly moistened with water using finger tips    
    3. Place second crust directly on top
    4. Roll to desired size
    5. Form and trim    


Tres Leches Cake
"Three Milks"
This classic Spanish desert is commonly made with sponge or butter cake that’s soaked in a mixture of “Three Milks” (the English translation of its name), evaporated, sweetened condensed and heavy cream.  The desert is often finished with whipped cream. 
  
A friend shared his family’s version.  They substitute heavy cream with coconut milk.  Another twist, they make theirs with store bought white or yellow “boxed” cake and top with Kraft’s© Cool Whip, whipped topping.  My personal preference is traditional whipped cream but your choice. 
   
I used a 9” by 9” pan and a 10” x 13” baking pan also works well and makes a little thinner cake.  Regardless which width and length, find a pan with higher sides so the total space inside (volume) will accommodate the risen cake and the three milks.

The yellow box cake I used also contains pudding and produces a surprisingly tasty and moist cake.

Results, an incredibly super moist and delicious cake and very easy to make. 
Ingredients:

One yellow butter cake mix with pudding or white plus additional box recipe ingredients.

Three milks
  • 1-14 oz. can sweetened condensed milk
  • 1-12 oz. can evaporated milk
  • 13.5 oz. can coconut milk

Whipped Cream
  • 1-pint heavy cream
  • Powdered sugar
  • Vanilla or coconut liquor
Butter or non-stick spray the bottom and sides of the baking pan.  Trim parchment paper to cover the bottom and 2 sides of the pan and over as shown to make it easier to remove soaked cake.

Assemble cake ingredients and bake as directed until a toothpick in the cake’s center comes out clean.  Remove from oven and cool to room temperature.

Pierce cake through to bottom all over through with a folk or toothpick.  Any and all blemishes will be camouflaged.
     
Shake and place evaporated milk, sweetened condensed milk and coconut milk in a bowl; whisk together.  Slowly pour milk mixture over top of cake and cover with plastic wrap.  Place cake in refrigerator at least 2 hours.

Whip cream to soft peaks adding powdered sugar and vanilla extract to taste.  Optional, garnish with strawberry slices. 
  
Remove cake to a serving platter, top with whipped cream and serve.     


Con la torta di tre latti
Italian Version of Tres Leches Cake..."Three Milks"
With Amaretto Cream and Amaretto Chantilly

As discussed above, Tres Leches Cake is a wonderfully delicious Spanish desert.  It is rich in taste and very easy to make.  I thought it would be fun creating variations of this great desert with different flavors while using the same core ingredients and easy assembly techniques? 

The idea isn’t to compete with this near perfect desert but praise it by adding a menu of different tastes to also enjoy.  After all, don’t we have more than one flavor of ice cream and more than just apple pie to choose from?

Being an Italian cooking website, it shouldn’t be a surprise the first is Italian influenced.  Italian Inspired Cake with Three Milks replaces coconut milk with Amaretto cream.  Traditional whipped cream is replaced with Amaretto Chantilly Cream.     
Ingredients:
Boxed Cake
  • yellow butter cake mix with pudding plus added ingredients 
Three milks
  • Amaretto cream
    • ½ cup whipping cream
    • ½ cup whole milk
    • 3 tablespoons sugar
    • ¼ cup Amaretto
    • 2 teaspoons corn starch
  • 1-14 oz. can sweetened condensed milk
  • 1-12 oz. can evaporate milk
Amaretto Chantilly Cream
  • 1 1/3 c heavy cream
  • 2 teaspoons vanilla
  • 4 teaspoons Amaretto Liquor
  •  ¼ cup sugar
  • ¼ cup sour cream
Spray bottom and sides of a 9”x13” or 9”x9” (shown above) with non-stick spray.  Trim parchment paper to cover the bottom and 2 sides. 

Assemble cake ingredients and bake as directed until a toothpick in the cake’s center comes out clean.  Remove from oven and cool to room temperature.

Remove cake from pan.  Line inside of baking pan (bottom and sides) with one solid sheet of plastic wrap.  Place cake back into baking pan.

Whisk Amaretto cream ingredients (whipping cream, milk, sugar, Amaretto, and corn starch) in a pot.  Place over medium heat.  Bring to a simmer while continuing to whisk.  Remove from heat when thickened enough to coat the back of a spoon.  Place into a bowl with sweeten condensed and evaporated milks.  Whisk until well combined. 

Pierce cake top through with a folk.  All blemishes will be camouflaged.

Give milks a final whisk and slowly pour milk mixture over top of cake, hesitate if need for milks to absorb.  Cover with plastic wrap and refrigerator for at least 3 hours, preferably overnight. 

In a chilled bowl using cold blades mix heavy cream, vanilla, and Amaretto for a couple of minutes.  Add sugar and sour cream until soft peaks.

Remove cake to a serving platter with the help of plastic wrap.  Top with Chantilly cream; cut and serve.    


Creamy Custards...Discussion*
What are the differences and similarities among Crème Caramel, Crème Brulee, pot de crème and “Spanish” style Flan.

All are made with different combinations of milk and cream products.  All are thickened with eggs, vanilla or other flavoring added, and sweetened if basic ingredients like sweetened condensed milk aren’t included. 

Traditional Spanish style flans* are versions of Crème Caramel.  Both begin with a coating of freshly made caramel on the bottoms of ramekins or pie plate then filled with well blended custard.  They are oven finished, baked in a water bath.  Once cooled, plated; flipped over, caramel sauce is allowed to drizzle and coat. 

Crème Brulee is the richest, made with heavy cream.  After chilled and set, they are topped with sugar(s) and charred under a broiler or with a torch forming a somewhat mirrored coating.

Pot de crème, "pot of cream" is a traditional French desert.  Flavored custard is prepared stovetop and baked in cups or ramekins in a water bath partially up their sides.  

*Obviously this discussion is an over simplification.  There are many versions, flavors, and techniques that can be and are often incorporated.
  
Note:  Origin of flan has been disputed but has been around for centuries.  “Flan” also refers to tarts; not only deserts but food tarts.  I often refer to flans as “Spanish”.  Modern recipes for Spanish areas often call for evaporated and sweetened condensed milk.  Some substitute coconut cream or other milks. 


Banana Crème Flan

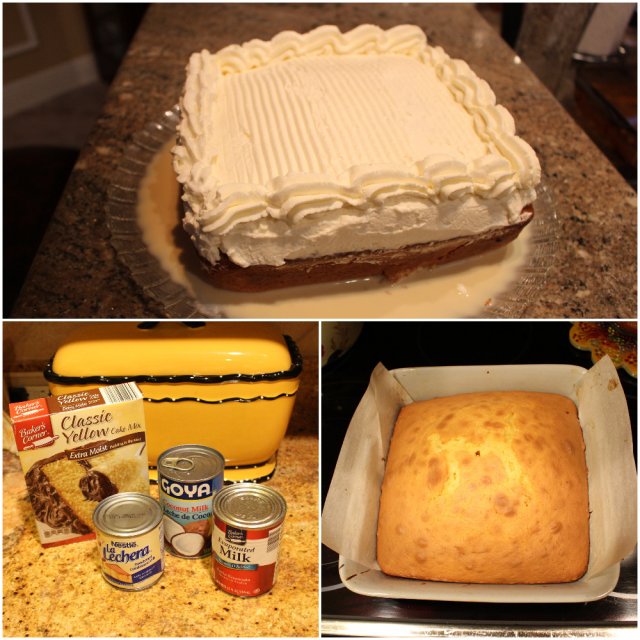
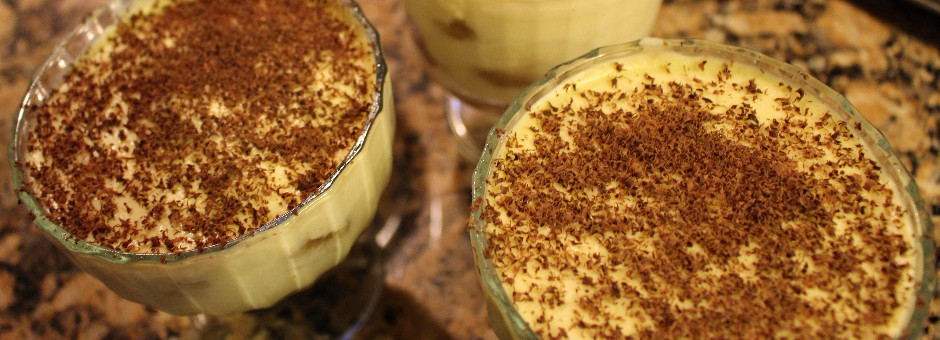
Love Spanish flan?  This delicious version is flavored with fresh banana and Cream of Banana liquor. 

Other than unique banana flavors, flan is traditionally prepared.  Ramakins are first layered with sauce, topped with custard.  Baking pan is filled halfway up the sides of the ramakins with water.     

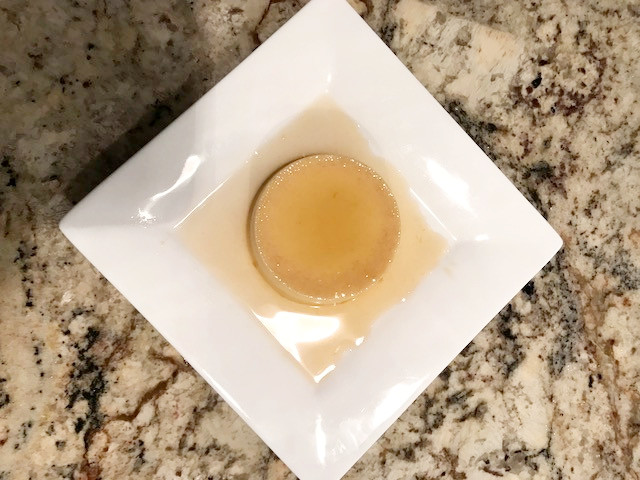
Baked ramekins are flipped and released onto individual plates, custard on the bottom, sauce draped over top. 

Exquisite.

Ingredients:
  • 6 8-oz. or 8 smaller ramekins
Banana Sauce
  • 1 ¼ cup Cream of Banana liquor*
  • 1 ½ Tablespoons dark (or light) brown sugar
Custard
  • 1 can (14 oz) sweetened condensed milk
  • 1 can (12 oz) evaporated milk
  • 1 Banana mashed (generous half cup)
  • 4 large eggs
  • 2 Additional Tablespoons Cream of Banana liquor*
Optional garnish
  • Chopped macadamia nuts or fresh berries 
*Less expensive brands are fine
Preheat oven to 350° convection. 

For sauce whisk to dissolve brown sugar with banana liquor in a small pot.  Place over medium heat.  Continue whisking until mixture begins to simmer.  Remove from heat when mixture begins to thicken and coats the back of a spoon.  Distribute evenly in ramekins.  Refrigerate.  Sauce will thicken more and the tops will form a mirror finish.

For custard in a food processor, or bowl with a hand mixer, beat condensed and evaporated milks with mashed banana.  Mix at low speed until banana incorporates, then on high until smooth.  Continue beating while adding one egg at a time.  Add liquor and mix until smooth.

Place ramekins in a roasting pan.  Distribute custard equally in each.  Add hot water to the pan halfway up the outsides of the ramekins.  Place in oven until custard is almost set but still wiggles when cups are shaken, pending size, about 40 minutes.  Place in refrigerator until a half hour before serving.

Slide a butter knife vertically around the custard's rim to prepare for releasing.  Nudge flan towards center to loosen. Flip ramekin onto a plate and tap to release emptying all the sauce over custard.

Optional garnish.


Optional Non-Traditional Preparation:

Butter inside bottoms of empty ramekins.  Prepare custard according to the traditional recipe above. 
Place ramekins in the baking pan.  Distribute custard equally in each.  Add hot water in pan up to half the height of the ramekins.  Bake according to directions above. 
  
While baking, prepare sauce with liquor and brown sugar.  Remove from heat.  When ready to serve, release custard and plate.  Warm sauce adding more liquor if needed to thin.  Pour sauce over custards.  Add optional garnish.


Amaretto Flavored Flan Custard, With Amaretto Sauce
This is another "Non-Traditional" flan preparation flavored with Amaretto.  Custard is baked without caramel on the bottom, when served, topped
Ingredients:
  • 6 8-oz. or 8 smaller ramekins.
  • Small pat of butter
Custard
  • 1 can (14 oz) sweetened condensed milk
  • 1 can (12 oz) evaporated milk
  • 4 large eggs
  • 2 Tablespoons more Amaretto liquor
Amaretto Sauce
  • 1 ½ cup Amaretto liquor*
  • 1 ½ teaspoons cornstarch
*Less expensive brands, DEKUYPER AMERETTO or similar
Preheat oven to 350° convection.

Lightly coat the bottom of each ramekin with butter and place in a baking pan.

In a food processor or bowl with a hand mixer, beat condensed and evaporated milks until smooth.  Continue beating while adding one egg at a time.  Add liquor and mix until smooth.

Divide custard evenly among ramakins. 

Fill pan with hot water halfway up the outsides of ramekins.  Place in oven about 40 minutes until custard is almost set but still wiggles when cups are shaken.
 
Amaretto Sauce, whisk amaretto and corn starch in a pot until liquor is clear.  Place over medium heat, whisking occasionally.  Remove from heat when sauce reduces to about half and begins to thicken.  Reserve until ready to serve.  Sauce will thicken more as it reached room temperature. 

When ready to serve, warm sauce.  Add some additional amaretto if needed to thin.  Slide a butter knife vertically around the custard's inside rim to prepare for releasingRevert onto a plate to release custard.  Top with slightly warmed delicious amaretto sauce. 

Optional, garnish plate with sliced toasted almonds, finely crushed amaretto cookies, or simply with maraschino cherries. 


Dutch Apple Cake with Lemon Sauce

This was one of my favorite deserts and mom made it for me often.

Her Dutch Apple scone cake is topped and baked with slices of cinnamon sugar apples.   What made this simple desert exceptional was mom’s hot lemon sauce.      

The only change to mom’s original recipe is my doubling her lemon sauce recipe to insure lots of extra sauce is reserved for ice cream and other deserts.  Yes, it’s that good. 


See Glutin Free Version below
image-934593-IMG_2618_(2)-6512b.jpg
image-934594-IMG_2621_(2)-9bf31.jpg

Ingredients:

Scone Dough

  • 2 cups flour
  • 2 tablespoons sugar
  • 4 teaspoons baking powder
  • 1/2 teaspoon salt
  • 1 tablespoon lemon rind
  • 5 tablespoons cold butter
  • 1 beaten egg
  • 3/4 cup heavy or whipping cream

Apple Topping

  • 3 apples peeled, cored, and sliced
  • 2 tablespoons sugar
  • 1/2 teaspoon cinnamon

Lemon Sauce (2x recipe)

  • 2 cup sugar
  • 6 tablespoons cornstarch
  • Pinch of salt
  • 4 cups boiling water
  • juice and grated rind of 2 large lemon
  • 2 tablespoons of butter


Whisk all dry ingredients and lemon rind.  With a hand mixer on low, cut butter into dry ingredients.

Mix beaten egg and cream.  Gradually combine into the flour mixture. 

Place in a greased 7x9 or 8x8 Pyrex cake pan.

Topping; press apple wedges, points down in rows into the dough.  Combine sugar and cinnamon and sprinkle over apples.  

Bake in a preheated 400º oven for about 25 minutes until apples are softened and a tester comes out clean.

Lemon Sauce; mix sugar, salt, and cornstarch in a saucepan.  Gradually add boiling water stirring continually over medium heat until the mixture thickens.  Lower heat and simmer for about 5 more minutes while continuing to stir.  Add lemon juice, lemon rind and butter until combined.  Remove from heat. 

Reheat before serving.  Pour over cake leaving a generous puddle of Hot Lemon Sauce.

Dutch Apple Cake with Lemon Sauce
Gluten and Dairy Free Version
The availability of gluten free substitute ingredients continue to grow.  Creating Gluten Free deserts in particular have become much easier, except when guests are also dairy intolerant. 

This recipe is a gluten and dairy free version of mom's Dutch Apple Cake with Lemon Sauce above.  Desert is every bit as good as mom's original.   Her rich scone dough is substituted with dough made with Namaste brand gluten, dairy and nut free Muffin & Scone Mix.  I made changes to their suggested add-ins to try and simulate mom's recipe.  The mix proved to be very satisfying.  Check out their Namaste Brand's website: www.namastefoods.com.                  

Ingredients:
Scone dough
  • 1 16 oz. box Namaste brand gluten free Muffin and Scone Mix
  • 1 tablespoons lemon rind
  • 1 tablespoon sugar
  • 2 eggs lightly beaten
  • 1/4 cup vegetable or canola oil
  • 1 cup unsweetened almond milk
Apple topping
  • 3 Granny Smith apples peeled, cored and sliced
  • 2 tablespoons sugar
  • 1/2 teaspoon cinnamon
Lemon sauce (consider doubling)
  • 1 cup sugar
  • 3 tablespoons cornstarch
  • Pinch of salt
  • 2 cups boiling water
  • juice and rind of 1 large lemon


Mix all ingredients.  Spray bottom and sides of a 5' x 11' x 3" deep bread pan or 8" x 8" pan.  Smooth scone on the bottom of the pan.    

Topping, press the apple wedges, points down into the dough in rows.  Combine sugar and cinnamon and sprinkle over apples.   

Bake in a preheated 400º oven for about 20 minutes until apples are softened and a tester comes out clean.

Lemon sauce, mix sugar, salt, and cornstarch in a saucepan.  Gradually add boiling water stirring continually over medium heat until the mixture thickens.  Lower heat and simmer for about 5 more minutes while continuing to stir.  Stir in lemon juice and rind.  Remove from heat.  Reheat before serving. 

Serve cake with a generous amount of hot lemon sauce.  

      
Lucia's Cream Cheesecake

This simple recipe is right out of Mom’s handwritten notebooks.  It was a favorite dessert in our house.  It has cake on the bottom, a light cream cheesecake layer on top.  She baked it in an eight-inch square Pyrex dish with vertical sides.      

I like this desert for several reasons.  It can be made a day ahead.  With the possible exception of cream cheese, all other ingredients are usually found in most kitchens.  It's the right size dessert for a casual dinner or luncheon and it’s light!  You can get creative, serving it with several fruit toppings or lemon curd.  It almost competes with boxed desserts for ease in making.  Did I mention it also tastes great?

Mom liked releasing the dessert to a serving dish in one piece.  She lined the base with parchment paper.  I don't bother; spreading the sticky cake base is a little harder with parchment. 

If making the same day, refrigerate at least a few hours ahead.  Remove closer to serving time.

We always have packaged berries in our freezer.  Making a blueberry topping as an example is as simple as hearting frozen berries in a pot with sugar to taste, thickening by evaporating some of the excess juices.  However, hands down, my favorite topping is the lemon sauce in the recipe above.  The lemon sauce can also be made the day before.  Refrigerate it right in the cooking pot.  When cooled to room temperature, it will form a jell that melts when reheated.  

Ingredients:
Cake batter
  • 1 1/4 cups flour
  • 1/4 cup butter
  • 1/2 cup sugar
  • 1/4 teaspoon salt
  • 1 1/2 teaspoons baking powder
  • 1 tablespoon milk
  • 1 egg
  • 1 teaspoon vanilla
Cream Cheese cake
  • 1 8 oz. package cream cheese
  • 1/2 cup sugar
  • 2 tablespoon flour
  • 1/4 teaspoon salt
  • 1/4 teaspoon vanilla
  • 3 eggs separated
  • 3/4 cups milk
Optional topping

Butter and flour an 8-inch square Pyrex baking pan with vertical sides.  Tap out excess flour.

If using parchment paper, Cut and place an 8-inch strip of parchment paper long enough to cover the bottom and 2 sides in one piece.  Place the parchment paper and butter lightly.  I don't bother with parchment and cut and serve directly from Pyrex.  

In a bowl, beat flour, butter, sugar, and salt with electric beaters until grainy.  Mix in remaining cake batter ingredients.  Place batter into the Pyrex baking dish.  Batter will be sticky.  Sprinkle lightly with flour to assist in spreading the mixture evenly on the bottom.

Beat egg whites until stiff and place aside.  Beat cream cheese, sugar, flour, and salt until smooth.  Mix in all remaining ingredients except beaten egg whites.  Fold in egg whites.  Pour over the cake mixture.

Place in a 325º convection oven until cream cheesecake top is tanned and set, about 25 minutes.  Don't over bake.

Cut in squares and serve plain or add your favorite topping like lemon sauce, above.


Apricot Walnut Tart with
Choice of Apricot Chantilly Cream or Apricot Cream Sauce  
This pastry is made with lots of ground walnuts, cinnamon, cloves, ginger, orange and lemon zest.  Everything pairs especially well with apricot. 

Although this tart doesn't need an additional topping besides the apricot glaze, I included a choice of two; Apricot Chantilly Cream or Apricot Sauce.  Both make an already wonderful and elegant desert even better. 

This recipe will generously fill a fluted 9 1/2 inch by 1 1/4-inch-high tart pan with removable bottom. The tart batter needs to be chilled before assembly.  It can be made a day ahead and refrigerated overnight.   
rev. 10-7-2020
Ingredients:
Pastry
  • 1 3/4 cup sugar
  • 3-sticks unsalted butter (12 oz.) at room temperature
  • 3 large egg yokes
  • 3 tablespoons orange zest
  • 1 1/2 tablespoon lemon zest
  • 3 1/2 cups flour
  • 2 teaspoons baking powder
  • 9 oz. finely ground walnuts
  • 1 tablespoon cinnamon
  • 1/2 teaspoon allspice
  • 1/4 teaspoon ground cloves
  • 1/4 teaspoon salt
Filling
  • 1 1/2 cup lightly sweetened apricot preserves
  • 2 teaspoons apricot liquor (optional)
Apricot Glaze
  • 1/2 cup apricot preserves
  • 1 tablespoon apricot liquor
Topping Options
Apricot Chantilly Cream
  • 1 cup heavy cream
  • 1 tablespoon sugar (or more to taste)
  • 1 teaspoon Apricot liquor
  • 2 tablespoons sour cream
Apricot Cream Sauce
  • 1 cup heavy cream
  • 1 cup drained apricot from a can and placed through a sieve
  • 2 teaspoons sugar or more to taste   
Using a food processor (or hand mixer) cream the sugar and butter until yellow and fluffy.  Process the eggs with the mixture one at a time followed by orange and lemon zest until combined.  

In a separate bowl, mix all dry ingredients, flour, baking powder, ground walnuts, cinnamon, allspice, ginger and salt.

Gradually mix all dry ingredients with the creamed butter mixture by pulsating a little at a time.  Do not over work.  Remove mixture and form two approximately equal size balls.  Tightly wrap each and refrigerate until well chilled or overnight.

To assemble, remove wrap from first pastry ball and work it onto the bottom and sides of the tart pan, making a flat well for the filling.        

If using apricot liquor, combine it with the apricot preserves in a bowl.  Evenly spread the mixture into the pastry.  Refrigerate the tart pan while preparing the lattice top.

Place the second ball on a floured surface.  Roll the dough into an oval shape, about 1/4 inch thick.  The center of the short side should be about the diameter of the tart pan in its center.

Cut the dough into 3/8 inch strips.  Using your tool of choice (a long and narrrow straight knife, a long spatula or a metal ruler), carefully place the longest strip across the center of the tart.  Add additional strips 1/2 inch apart until strips reach the ends of the tart.  Reserve all scraps.  

Second layer, place all usable strips at a 45-degree angle to the first layer, 1/2 inch apart.  Collect all scraps and roll into another ball 1/4 inch thick to convenient widths.  Repeat, cutting into 3/8 inch strips and placing them 1/2 inch apart.  Re-roll scraps again if needed.  Remember, the dough is easily patched.  Attaching shorter lengths won't be noticed once tart is cooked.           

Bake in a moderate 350º oven until the tart is lightly browned like soft cookies and the apricot filling is bubbling, about a half hour.  Do not overcook.  

Apricot Glaze
Place the preserves and the apricot liquor in a small sauce pan over medium low heat.  Stir continually until mixture starts to boil.  Remove pulp by pressing through a sieve.  Thin the glaze with hot water if needed.  Brush the glaze over the top of the tart while still hot.

Below are two great options for toppings to choose from prior to serving.  Serve a healthy dollop of either over slices of the tart. 
   
Chantilly Cream
Whip heavy cream in a chilled bowl until peaks are formed.  Whip in apricot liquor, optional sour cream and sugar to taste.

Apricot sauce
Whip heavy cream in a chilled bowl until peaks are formed.  Whip in the 2 teaspoons sugar.  Fold in the apricot pulp.  Test for sweetness and add more sugar if needed.


Lucia's Banana Lemon Tea Bread
With Optional Lemon Sauce

Our North End community was especially social.  Our first-floor apartment became a popular meeting place.  Friends, neighbors, and family frequently just popped in.  Everyone was welcomed.
    
Mom always made sure there she had homemade tea breads, coffee cakes, crumbles, and/or cookies available.  Mom’s simple Banana Lemon Tea Bread was one of my favorites.

Not only moist and delicious, it is a snap to make especially with today’s food processors.  I added Mom’s lemon sauce to her recipe.  I’m sure she wouldn’t mind. 

The finished tea bread can either be soaked with heated sauce or simply topped with sauce at room temperature.  Refrigerate unused sauce.           
Ingredients:
  • 2/3 cup butter
  • 1 cup sugar
  • 2 eggs
  • 3 medium large bananas, about 1 ¾ cups mashed
  • 1 teaspoon baking soda
  • 6 tablespoons freshly squeezed lemon juice
  • 2 cups flour
  • 1 teaspoon salt
  • 1 Tablespoon fresh lemon rind
Lemon Sauce
  • 1 cup sugar 
  • 3 tablespoons cornstarch
  • 1 pinch salt
  • 2 cups boiling water
  • Juice and grated rind 1 large lemon
  • 1 tablespoon butter
Food Processor Technique:
Cream butter and sugar by processing about 3 minutes.  Add eggs and beat until smooth, another minute or two.  Follow by bananas and lemon juice.  Add flour, salt, and corn starch.  Combine in the processor for a couple additional minutes.  Fold in grated lemon peel by pulsating a few times. 

Pour into a 5” x 9” x 3” buttered pan.  Bake at 325° convection for about 45 minutes or until a toothpick comes out clean.
 
By Hand:
Sift flour, salt, and cornstarch in a bowl; reserve.  Beat all ingredients by hand using the same sequences as above.
           
Lemon sauce:
Mix sugar, salt, and cornstarch in a saucepan.  Gradually add boiling water stirring continually over medium heat until the mixture thickens.  Lower heat and simmer for about 5 more minutes while continuing to stir.  Incorporate lemon juice and rind.  Remove from heat and serve with with Tea Bread. 


Braided Puff Pastry Apple Strudel.…
Casual Sweets Made Easy

Fruit desserts and strudels are conveniently assembled and baked using store bought puff pastry sheets.  Twin trifold sheets are purchased frozen.  They can be defrosted overnight in the refrigerator or on counter while preparing apples and other ingredients.

Use your favorite apple pie filling recipe or mine below.  I am partial to granny smith apples.  I like their tartness and resilience during baking.

Recipe makes two strudels.  They can be made a day ahead, even frozen and reheated for another occasion.

image-903330-kTy1K7An_(2)-9bf31.jpg
image-903331-CP0axmRO-45c48.jpg
Ingredients:
  • 4 or 5 medium granny smith apples
  • Juice from 1/2 lemon
  • Zest from 1 lemon (zester not grated).
  • 4 tablespoons sugar
  • 1 generous tablespoon flour
  • Pinches of cinnamon and grated nutmeg
  • 1 box, 2 puff pastry sheets
  • 3 tablespoons butter

Directions:

  1. Peel, core, and thin slice apples.  Place in a bowl.  Toss with lemon juice.
  2. In a separate bowl, mix sugar, flour, and spices.  Add and mix lemon zest.  Empty and mix contents of the small bowl with the apples.  Preheat oven to 375º convection.     
  3. Place a sheet of puff pastry on a lightly floured counter.  I prefer Increasing the length of pastry by a n added inch or so with a rolling pin.  Cut the pattern shown with approximate mirror image slits on each side, making all flaps about the same width.  Trim the ends as shown.
  4. Add apples onto the center of both sheets.  Top each with 1 tablespoon of butter in dots.    Fold right end over the filling and alternate tabs as cut at an angle.  Placing the end dough over apples and smooth matching side tabs over.     
  5. Melt the last tablespoon of butter and brush tops of both strudels.  Using a long spatula, lift both onto cookie sheet covered with parchment Bake for about 45 minutes.  Serve immediately.

This technique is not limited to deserts.  Please see my recipe for quick spanakopita, Easter Pie, and more, www.LuciaTramonte.con, under "Puff Pastry Appetizers" tab. 


Strawberry Shortcake with Buttermilk Biscuits
Is there a better desert to welcome summer? 

Mom was our family baker.  Although she served strawberries over homemade angle food and pound cakes, my favorite was with her Strawberry Shortcake Biscuits. 

She loved loading them with generous amounts of strawberries and juices.  One of her secrets was adding some water to her mashed strawberries and sugar.  After refrigerating for several hours and with an occasional stir, the berries softened and released much of their juices.

The difference between good strawberry shortcake and great are those puddles of juices.    

My shortcake recipe discussed above will produce 7 or 8 perfect sized biscuits. 
Ingredients:
Shortcakes
  • 2 1/3rd cups "Betty Crocker™ Bisquick™" , "Original Bisquick Mix"
  • 1/2 teaspoon baking soda
  • 2/3rd cup buttermilk
  • 3 tablespoons sugar
  • 3 tablespoons melted butter
Toppings
  • 2 1/2 to 3 16 oz.  packages ripe fresh strawberries
  • 2-3 tablespoons water
  • Approximately ½ cups sugar
  • Whipped cream (canned or homemade)
At least a few hours ahead, hull and rinse strawberries under cold water.  Select and reserve the best strawberries for garnish, one per shortcake.

Thick slice strawberries lengthwise and place in a bowl.  Add 2 tablespoons water.  Mash strawberries.  Add about half of the sugar and mix well.  Cover and refrigerate.

Preheat oven to 425º.  Mix Bisquick and baking soda.  Add buttermilk, butter and sugar; combine until smooth.  Divide batter and 7 or 8 spoonsful onto an ungreased cookie sheet.  Bake until golden brown, 10 to 12 minutes.

When ready to assemble, adjust strawberries with additional sugar and water as needed.

Cut shortcakes in half (2 rounds).  Layer serving bowls with bottom shortbread halves, generously with strawberries and juices and whipped cream.  Add top half, more strawberry mixture and whipped cream.  Garnish each with reserved whole strawberries.  Enjoy.   


Brie, Apricot Jam, and Honey Tart

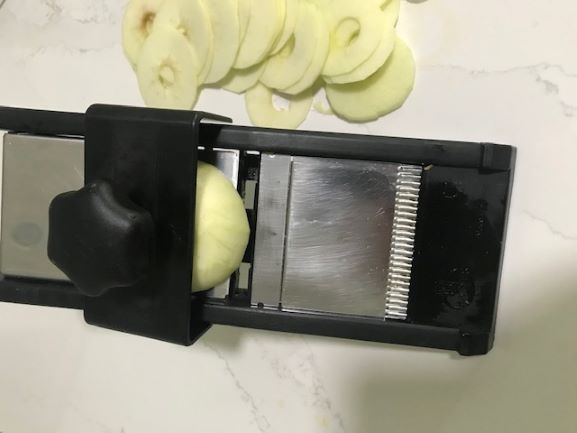
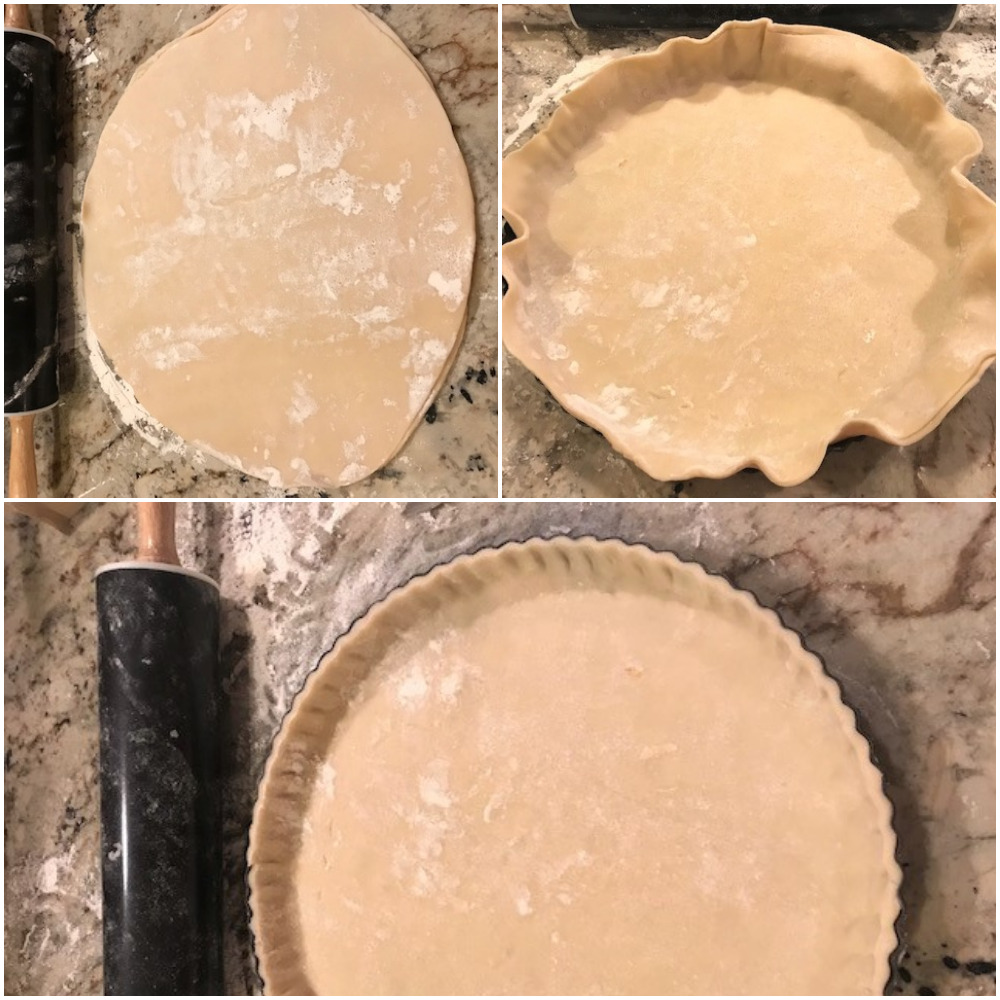
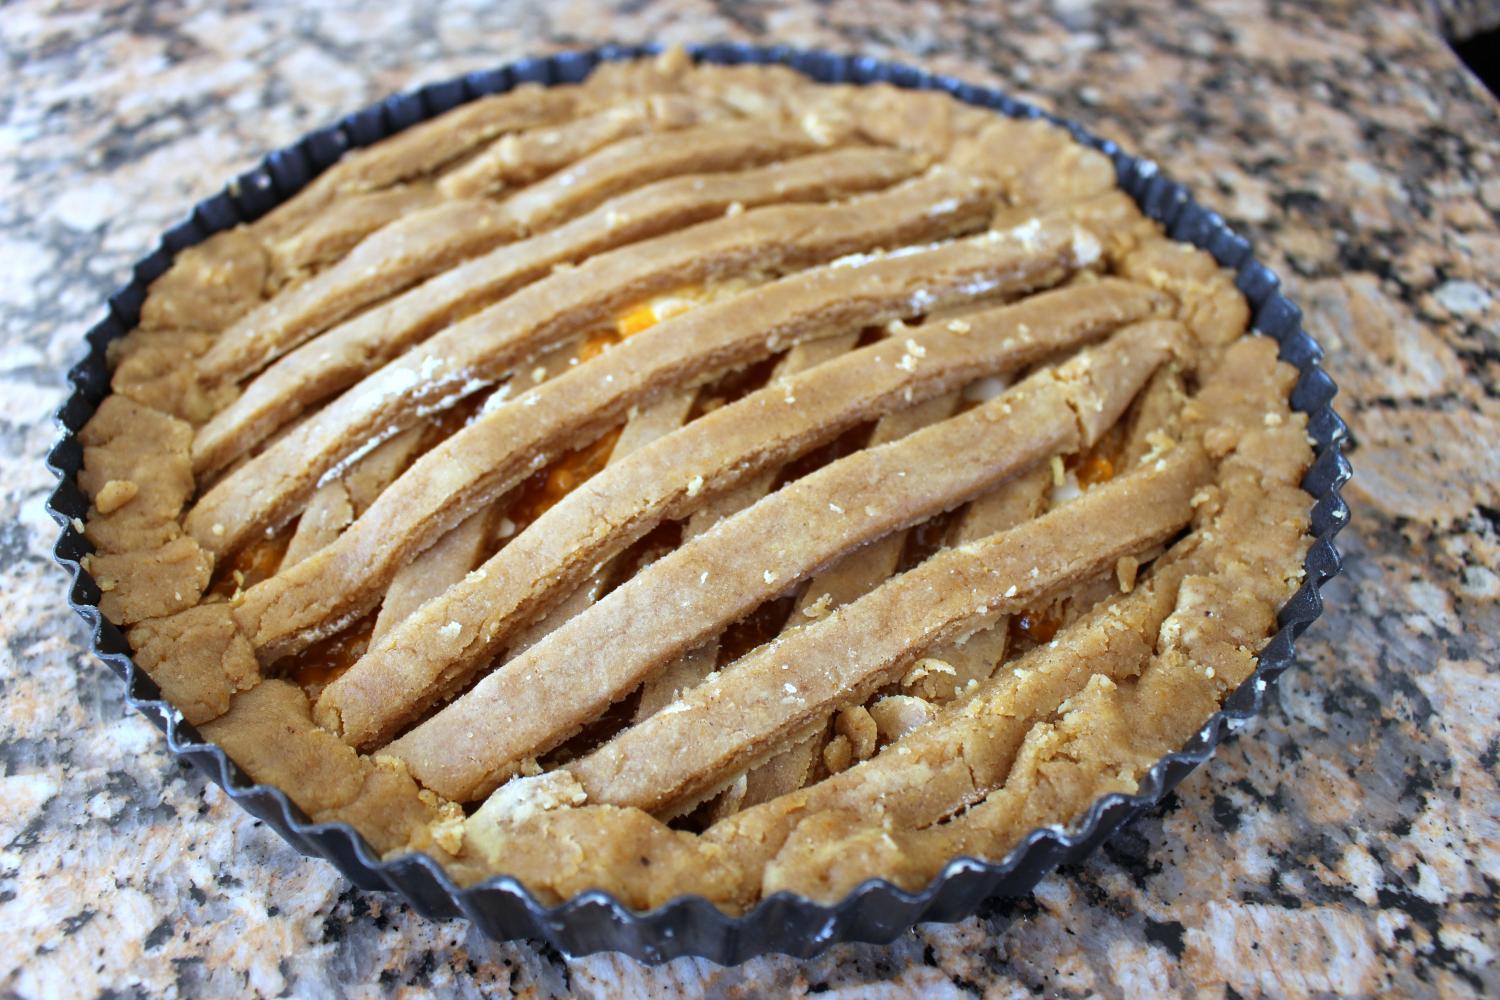
This simple but delicious tart was originally created to use leftover Brie from a get together.  It can be made with as little as half an 8 oz. round in an 8” tart pan with removeable bottom. 

A cookie crust bottom is topped with slices of brie, dotted with apricot jam and honey.

Simply proportion ingredients if using a larger tart pan.

Ingredients:

  • 1 ½ cups of ground social biscuits or animal crackers
  • 1 teaspoon sugar
  • 4 tablespoons butter
  • 4-6 ounces Brie
  • Apricot preserves, regular or sugar free
  • Honey

Preheat oven to 325° convection. 

Process cookies to produce 1 ½ cups of fine crumbs. 

Pulse with sugar.  Add softened butter and pulsate until texture is like wet sand. 

Evenly spread on the bottom of the ungreased tart pan and lightly press down.

Bake until lightly tanned, 8-10 minutes. 

Increase heat to 350° convection. 

Slice brie 1/8 inch or thicker.  Cover the crust with slices of Brie.  Dot with apricot jam.  Drizzle top with honey.  Bake until cheese and apricot are melted and honey glazes, about 8-12 minutes.            


French Chocolate Cake

The French have a knack for decadence, and nothing says decadence more than their dense and fudgy French Chocolate cake. 

It’s a chocolate lovers dream, heavy on chocolate and butter with just enough flour to keep it together.  It includes eggs yokes and beaten egg whites folded in.   

Finished cake is simply topped with powdered sugar.  I also enjoy serving it on a puddle of raspberry coulis or with a dollop of sweetened whipped ricotta and cream on the side. 

The original recipe given to me insisted on fancy gourmet chocolate.  Along with some changes in proportions, I can't detect any difference using good old Nestlé® TOLL HOUSE SEMI-SWEET MORSELS.  

I always have a warehouse club size bag on hand.  Since remaining ingredients are kitchen staples, I often make this delicious cake on a whim. 

    
Ingredients:
  • 12 oz. semi-sweet chocolate
  • 1 1/2 sticks unsalted butter
  • 1/3 cup sugar plus 3 tablespoons
  • 2 teaspoons vanilla
  • 6 eggs separated
  • 1/3 cup flour
  • Pinch salt
  • powdered sugar.


Preheat oven to 325º convection.  Coat the inside of a 9 1/2" spring form pan with butter.  Sprinkle with sugar.  Tap to shake out excess.

Melt chocolate and butter over low heat.  Stir in sugar, vanilla and salt.  Transfer mixture with a spatula in a bowl large enough to hold all ingredients.  Beat with egg yolks a little at a time.  Incorporate flour.

Beat egg whites with remaining 3 tablespoon sugar in a scrupulously clean bowl.  When glossy peaks form, beat in about a third with the chocolate mixture.  Fold in the remaining egg whites and place in the spring form pan.  Bake until a tester comes out clean, about 35 to 40 minutes.  Surface may signal readiness with small spider cracks in its center    Sprinkle with powdered sugar just before serving.


Optional raspberry sauce:  Place a 24 -ounce package of frozen raspberries in a non-reactive pot.  Thaw covered over medium heat.  Simmer for about 10 minutes.  Stir in 1/3rd cup of sugar.  Continue simmering for a few more minutes.  Remove seeds by pressing raspberry mixture through a mesh strainer into a bowl.  Return strained sauce to pot and simmer to desired thickness.  For quicker results, mix in a small amount of water with whisked corn starch.  Finish by stirring in a 1//4 teaspoon of lemon juice.   Luck enough to have leftover sauce, serve warm over ice cream. 

Optional whipped ricotta and cream:  In one bowl beat 1 cup of whole milk ricotta with a tablespoon of sugar.  In another bowl, whip chilled heavy cream also with an additional tablespoon of sugar to soft peaks.    Fold contents of both bowls together and serve cake a generous with a generous dollop on its side.     


Cheesecakes
Although they can be elaborate, basic cheesecakes are a snap to make especially when using a food processor.  They usually require limited ingredients, are almost full proof, and can easily be customized with different crusts, toppings and flavored fillings.  Although we traditionally think of cheesecakes made with cream cheese, Italian versions commonly use ricotta cheese or a combination of both.     

          
My Favorite Chocolate Cheesecake
Shown with optional Rasberry Topping 

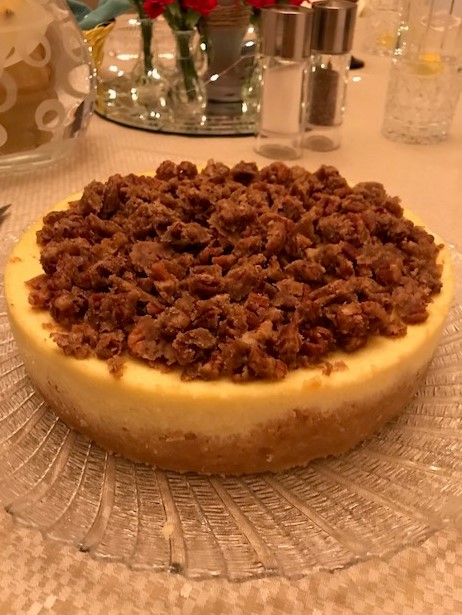
This decadent chocolate cheesecake is assembled in a 9” springform pan.  It starts with a simple baked chocolate cookie crust followed by a rich and balanced chocolate filling. 

Cake is finished either with a raspberry topping pictured above or a chocolate ganache. 

Ingredients are minimal and are easy to assemble with the aid of a food processor.   

Like most cheesecakes, add-ins are nearly endless.  The peanut butter cup version below converts this sophisticated desert to something whimsical.
Ingredients:
Crust
  • 2 cups chocolate animal cracker crumbs.  Can substitute with chocolate graham, chocolate shortbreads, etc.
  • 5 tablespoons unsalted butter
Filling
  • 3 8 oz. packages of cream cheese
  • 1/2 cup sugar
  • 4 large eggs
  • 6 oz. semi-sweet chocolate melted
Boiling water
Optional Raspberry Topping
  • 1 package frozen raspberries (10-12 ounces)
  • 1/4 cup sugar (more to taste)
Optional chocolate and sour cream topping
  • 6 oz. semi-sweet chocolate melted
  • 3/4 cup sour cream
Pulsate chocolate crackers in a food processor to produce 2 cups of fine cookie crumbs.  Add butter and Process.  Press crumbs onto the bottom of a 9” spring form pan.  Bake at 325º until set, about 8 minutes.  When cooled, double wrap the bottom and sides of the pan with heavy aluminum foil to seal.  Increase oven temperature to 350º.

Mix cream cheese and sugar in the processor.  Add eggs one at a time followed by melted chocolate.  Scrape sides with a spatula and continue beating until smooth. 
   
Pour cheesecake filling in springform pan. 

Water bath.  Place aluminum wrapped springform in a roasting pan.  Place them in the middle of the oven.  Pour hot water in the roasting pan until the bottom inch of the springform is under water. 
        
Bake until filling is just set in the center, about 40 to 50 minutes.  Take pans out of oven.  Remove springform from roasting pan but do not remove cheesecake from springform.  When cool, remove foil, and place cheesecake in refrigerator to set overnight.   

Next day prepare choice of topping.  
  
Raspberry topping:  Place frozen raspberries into a pot.  Stir over medium high heat until raspberries thaw.  Stir in sugar for several minutes.  When cooled to room temperature, spread over cheesecake.  Place back into the refrigerator.  Topping will thicken as it cools. 

Remove and plate cheesecake an hour before serving.

Chocolate and sour cream topping:  Wisk melted chocolate and sour cream.  Spread over the cheesecake and refrigerate until ready to serve.  


Chocolate and Peanut Butter Cup Cheesecake
Everyone loves chocolate and Reese's Peanut Butter Cups.  This great cheesecake is just a little whimsical, perfect made with the help of grandchildren.  It has a chocolate animal cracker crust, and chocolate cheesecake filling with Reese's Peanut Butter Cups in the middle.  It's especially easy to make if using a food processor.  A hand mixer works almost as well. 
         
Ingredients:
Crust
  • 2 cups chocolate animal cracker crumbs (or or chocolate graham, shortbreads, etc.)
  • 5 tablespoons unsalted butter
Filling
  • 3 8 oz. packages of cream cheese
  • 1/2 cup sugar 
  • 4 large eggs
  • 6 oz. semi-sweet chocolate melted
  • 1/2 pound Reese's Mini Peanut Butter cups quartered.
Boiling water
Optional Garnish
  • Finely chopped additionsl peanut butter cups
In a food processor, pulsate chocolate crackers into 2 cups of crumbs (can be done in a zip lock bag with a rolling pin).  Process the butter into the crumbs.  Press crumbs onto the bottom and and half way up the sides of a 9 inch diameter spring form pan.  Bake at 325º until set, about 8 minutes.  When cooled, double wrap the bottom and sides of the pan with aluminum foil.  Increase oven temperature to 350º 

Mix cream cheese and sugar until smooth; add eggs one at a time followed by the melted chocolate; beat until fully incorporated.

Pour about a third of the filling over the cookie crust.  Cut mini peanut butter cups vertically in half and gently place a generous single layer on the filling.  Cover with the remaining filling.

Place into a roasting pan and both into the oven.  Add about an inch high of boiling water to the roasting pan.  Bake for 40 to 50 minutes, until filling is set in center.

Once cooled, refrigerate overnight.  Remove and release to a large plate shortly before serving.

Option, garnish with chopped peanut butter cups.


Lemon Sugar
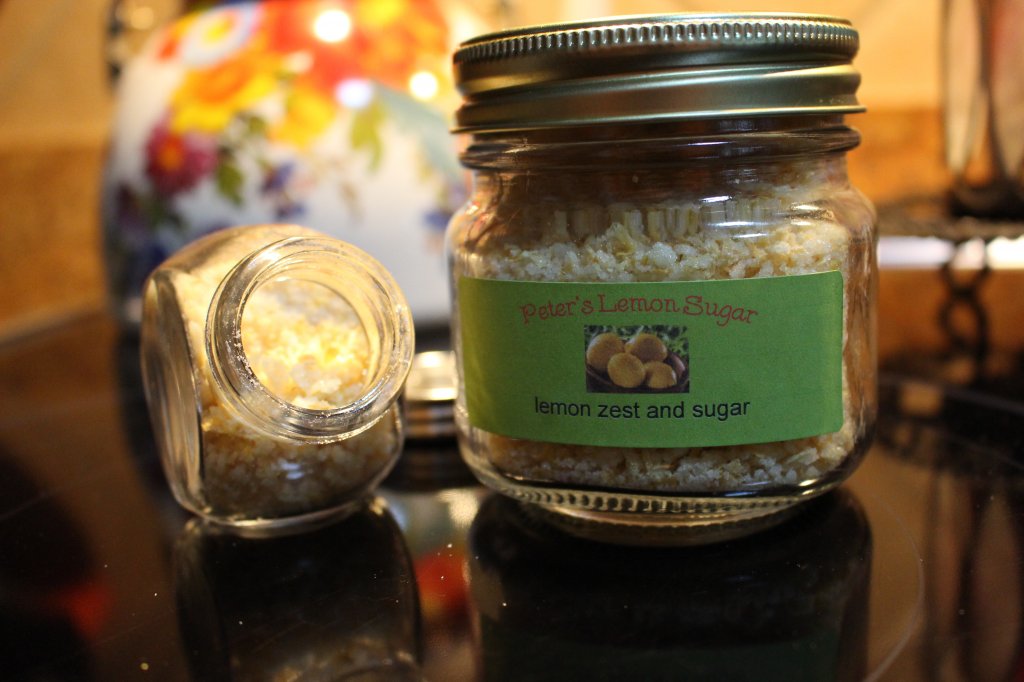
A simple sweetener enjoyed in tea or used as a light topping for ice cream and frosted deserts.  Lemons' zest is mixed with sugar and sun dried on a parchment lined cookie sheet.

I start every day with a cup of hot water and lemon juice.  Packed with 10 or 11 small lemons in 2 pound bags, each lemon provides the right amount of juice for each cup. 

Lemon sugar is a great by-product made with the zest of those lemons.  When dried with a cup of sugar, yields about a cup and a half of lemon sugar. 

I experimented with several zester and graters.  Zest collected from cheese type graters is too fine while zesters with a line of circular cutting holes were thick and long and required manual chopping.  My personal preference is a "Microplane Sharper Cutting Tools".  I have an older version, model 40020 but a quick on-line search showed several apparently newer models, all highly rated.

What do I do with a new batch of lemon sugar every 10 or 11 days?  I fill and label 8 oz. plain preserves jars and give them away to friends.  Making and gifting lemon sugar also makes a wonderful fun project for children and grandchildren.  

Important note: The inside of new preserve jars and their screw tops often have a stale odor.  Whether new or used, I soak jars and tops with vinegar and water, rinse and sun-dry them. 
       
Ingredients:
  • 2-pounds small lemons (about 10 or 11 lemons)
  • 1 cup granulated sugar
Use a "Microplane" type zester/grater to remove the zest from all lemons.  In a bowl, combine zest with sugar.  Combine thoroughly.

Spread on a cookie sheet lined with parchment.  Place it outside in the sun.  After about an hour, break clumps, mix and re-spread.  Pending the strength of the sun and temperature, they will be dry anywhere from about 2 to 4 hours.  You also can oven dry in an over set to 90°to 100°.

When ready, place mixture in a zip lock bag.  Use a meat pounder or rolling pin to remove clumps. 

Store the lemon sugar in tightly sealed container(s).               
 
 
Fluffy Buttermilk Biscuits
One of my all-time favorite store bought mixes is "Betty Crocker™ Bisquick™".  I've always questioned why so many online sites publish homemade versions of this already terrific product.  Why?  Is there anything quicker, better or easier?

Have you ever looked in your cupboard at night searching for a sweet snack only to find stale cookies.  Try this variation. 

Serve them plain or topped with your favorite preserves.                    

Ingredients:
  • 2 1/3rd cups Original Bisquick Mix
  • 1/2 teaspoon baking soda
  • 2/3rd cup buttermilk
  • 3 tablespoons sugar
  • 3 tablespoons melted butter
Preheat oven to 425º.  Mix Bisquick and baking soda.  Add buttermilk, butter and sugar; combine until smooth.  Divide batter and 7 or 8 spoonsful onto an ungreased cookie sheet.  Bake until golden brown, 10 to 12 minutes.