Bread

Sourdough starter Discussion
Basic Everyday Bread Loaf, French Style Loafs or Rounds
Quick and Easy Sourdough Bread 

Quick and Easy Sourdough Bread Braided with Sesame Seeds                                                                    Quick and Easy Whole Wheat Sourdough Bread 

Quick and Easy Semolina Bread 

Rustic Boule Perfectly Baked in a Dutch Oven   

Rustic Multi Grain Sourdough Bread with Farro, Whole Wheat and Rye….
    Remarkably Quick, Easy and Flavorful.
Flavored Stuffed Breads
Oatmeal Rye Bread
Potato Bread​​​​​​​
Southern Biscuit Dinner Rolls and Logs ​​​​​​​
Southern Cheddar Cheese Biscuit Rolls
Rye Bread, Free Form or Loaf Pan Baked
​​​​​​​Potato Rye Bread

Is there anything more welcoming than the smell of piping hot bread right out of the oven?  There's something special, perhaps even mystical about making bread.  The more you get into the science of bread, variety of grains, flavors, shapes and enhancements and your choices of unique leavening agents, the more fascinating the subject becomes.

The good news, good basic breads are simple and require surprisingly few core ingredients; yeast, water, flour, salt and sugar.  The ratio of about 2 1/2 cups of warm water to 6 cups of flour is the approximate proportion for many types of bread. 

The first recipe is a delicious basic and relatively quick bread, leavened with fast rising yeast.  It can be enhanced with sourdough starter if available and some olive oil.  An egg wash will give it a nice brown exterior.  Making bread is much simpler than you probably thought.  Enjoy.  

Before offering the first recipe, next is a brief discussion about sourdough starters and how they frequently are used in sponges, a process for leavening dough usually over days.                      

       
Sourdough Starters
Long before processed yeast was available, family bakers developed starters, their way to create wild yeasts and bacteria for leavening.  They combined natural fermenting agents (water, crushed grapes, milk, potatoes, pineapple, sour cream, or any number of available plants and liquids) with flour.  Over days and through a process of re-energizing the mixture, they made a reliable leavening compound to raise breads. 

Once the sourdough starter was ready, they would begin the process of making bread a few days ahead.  It took several days to activate and ready the dough for baking.  Only a portion of the starter was used.  They would mix more flour and liquid to the remaining.  Not only did this replenish the amount of starter used but would "feed" the natural enzymes to keep them happy, active, available and ready.   

Today, it's amazing that some starters were passed down from generations.  You can purchase starters on line claiming its origins are 50 or more years old.  Others might also certify their starters are from recognized and treasured locations like San Francisco, ground zero for US sourdough bread production.  

My first starter was a gift from my friend Ralph who initiated me into bread making.  His starter traced back 20 years earlier.   You can buy sourdough starter from many sources including from King Arthur Flour on line or if lucky, a proven starter free from a friend that's willing to share.   

You can also make your own sourdough starter.  Mine was made with whole grain rye flour, water, and a pinch of sugar and quick yeast.  It took about a week of slight pampering and feeding with unbleached wheat flour and more water to ready it for baking.  There are plenty of easy recipes and procedures on line and in books.  Some ingredients will create sourdough that's more poignant than others.  Once established maintenance is easy and will give you years of service.         

Lastly, I am surprised to see volumes of discussion on line about the benefits of using sourdough cultures to slowly add leavening to bread dough over several days.  Claims are the longer the dough is processed, the easier bread is to to digest.  Since quick yeasts were commercialized, some claim that quickly readying breads in hours for baking doesn't properly prepare wheat gluten for human consumption.  I'm certainly not an expert but wonder if that has contributed to the proliferation of gluten intolerance.  


Basic Everyday Bread, French Style Loafs or Rounds
image-placeholder.png
This everyday basic bread recipe can be made with only six ingredients, flour, water, yeast, salt and sugar.  If lucky enough to have sourdough starter, 2 heaping tablespoons will provide additional depth of texture and flavors.  Another option is to add a tablespoon of olive oil when adding flour.  It slows bread from drying out.  An egg white and water wash will help the dough develop a beautiful brown crust during baking. 

Once ingredients are gathered, delicious bread can be table ready within two to three hours.

Dough can be shaped into French style loafs (as shown), cooked in perforated loaf pans or free style on cookie sheets.  They can also be shaped into rounds.  Lightly spray pan or sheet with non-stick and lightly top with course cornmeal.       

All ingredients are mixed and kneaded into dough either by machine with a dough hook or by hand; set aside to rise.  Risen dough is punched down, divided and shaped into 4 French loafs or rounds and placed in a coated loaf pan or cookie sheet per above.  Instead of giving the formed loaves a second rise, try this technique.  Do not preheat the oven.  Set temperature to 420º direct heat, not convection.  Place an empty cookie sheet on the bottom shelf.  Brush loafs with the egg white and water wash and place pan or sheet in the middle of the oven.  As the oven temperature increases to temperature setting, the dough will rise and the empty bottom cookie sheet baffles the direct heat preventing scourging.  Bread will be ready in about a half hour when the crust is nicely browned, crusted and the bread sounds hollow when tapped.

Homemade breads don't have added preservatives like many store brands have to keep them fresh.  Even after several days when bread appears a little dry and hardened, cut and toast.  You will be amazed how good the toast tastes.  You will never feed this leftover bread to the birds!                               
Note:  This basic dough is also perfect for homemade pizza.  You can also use this dough to make flavored breads like garlic, olive, cheese and herbed breads.  Look for additional recipes to follow.          
Ingredients:
  • 2 tablespoons active dry yeast
  • 1 tablespoon sugar
  • 2 1/2 cups warm water
  • 1 tablespoon salt
  • 1 tablespoon olive oil Optional, see above)
  • About 6 cups (may need a little more or less) unbleached all-purpose or bread flour
Egg wash
  • White from 1 egg
  • 1 tablespoon water
Optional, 2 heaping tablespoons sour dough starter

Invest in a stainless dough scraper.  Many are under $10, some less than $5.  They will help corral dough as you knead and are essential for cleanup.     
Mix water, yeast, and sugar in an electric mixer with a dough hook.  If proofing, wait until the yeast froths signaling the yeast is active.  Once you have a history with bulk yeast, proofing usually isn't necessary.  

With the dough hook continually rotating, add olive oil and salt.  Gradually incorporate about 5 cups of the flour.  Slowly add the remaining cup of flour until a dough ball forms and releases from the sides and bottom of the mixing bowl.  You may need to add a little more or less flour than the original 6 cups.

Knead dough on a floured counter for a couple of minutes more by hand.  Place dough in a large bowl sprayed with non-stick.  Cover with plastic wrap and a damp towel.  Place in a warm area away from direct sun until dough more than doubles, about 1/2 hour.  

Let the dough relax for a few minutes on a floured counter.  Knead the dough into a large ball.  Divide it into approximately four equal quarters.  Form each into loaves.  Place them either in a perforated nonstick molded bread pan or cookie sheet with course corn meal.  With a very sharp knife, cut slits through the top of the loaves.  Some artisan bakers use their unique cuts as their signature.  Whisk the water and egg white and brush the top of the loaves.

Do not pre-heat the oven.  Place the bread in the middle of the oven and an empty cookie sheet on the lowest tray.  Turn heat to 420º direct heat, not convection.  Bread will be ready when browned and the bread sounds hollow when tapped on the bottom side.  Do not seal finished bread in airtight plastic.  It will lose crispiness.

Mixing by hand is not as difficult as it may seem.  Whisk water, yeast and sugar in a large bowl.  Add salt, olive oil and 5 cups of flour gradually incorporating by hand.  Empty the bowl onto the remaining flour on a counter.  Knead until dough is uniform and smooth, perhaps 6 to 10 minutes.  Use a dough scraper to pull flour against the dough ball.  Follow remaining procedures discussed above.                   


Quick and Easy Sourdough Bread
image-790042-IMG_6037_(2).jpg
image-790043-IMG_7340_(2).jpg
image-837637-IMG_8568_(3)-c51ce.jpg

When feeding sourdough with water and flour, some of the original volume is often discarded to make room.

I created this simple technique to make "Quick Everyday Sourdough Bread" to make use of the excess.  It’s so quick, easy, and delicious.  Neighbors and friends are particularly grateful.

Recipe results in surprisingly great taste with pleasing density and texture the very first try.

What also makes this bread different is an unusually quick and simple two-step assembly process.  Only tools needed are a bowl, spatula, dough scraper, and cookie sheet.  Bread is table ready in about an hour and a half  from scratch.   

Oh, and it makes a terrific pizza dough. 

Ingredients:
  • 2 cups hot tap water
  • 1 teaspoon sugar
  • 1  tablespoon instant dry yeast
  • 1 rounded tablespoon Kosher salt
  • 3 cups unbleached all-purpose flour
  • 1/2 to 3/4 cup sourdough starter
  • 2 cups additional flour
  • Oil and course cornmeal

Whisk water, sugar, yeast, and salt in a large bowl.  When combined, add sourdough and 3 cups of flour.  Mix thoroughly by scraping sides with a spatula and folding.   Texture will be moist and light. 

Spray a sheet of wax paper with nonstick.  Gently place sprayed side of wax paper on dough.   Drape top of bowl with a moist towel.  Rest in a warm location.  

Preheat oven to 450° direct heat and position a rack vertically in the center.  Place remaining 2 cup of flour on counter or on silicon.  Spread by hand. 

When dough doubles in size, about a 1/2-hour, empty dough onto flour.  With a dough scraper, fold flour on the periphery over dough all around while kneading.  Continue kneading until dough loses its stickiness and is uniform, ready to be formed.  

Cut, knead, and form dough into desired shapes.  Place on a nonstick or lightly oiled cookie sheet  dusting with course cornmeal.  Lightly brush with water.  Slit tops with a sharp knife or razor and place in oven. 

Bread is ready when crusty and has a hollow sound when tapped.   


Braided Bread Topped with Sesame Seeds…

Made with My Quick and Easy Sourdough Bread Dough, Recipe Above

image-848747-uwuxS7PM-aab32.jpg
image-848750-dgw6nrrH-6512b.jpg

This versatile dough can be formed in a variety of sizes and shapes.  Braided bread is elegant yet easy way to impress guests.  Toasted sesame seeds also add interesting nutty flavor and crispy texture.    

Follow recipe for “Quick and Easy Sourdough Bread.  After initial batter doubles in size, additional flour incorporated and kneaded smooth, divide dough in thirds.   Preheat oven to 430° direct heat.

For convenience, form one of the thirds into a log and cut again into three equal lengths.  One at a time, place dough between hands in prayer position and roll like you would a pencil until each is about 10 inches long.

Don’t fret if uneven.  Like magic, irregularities will smooth out as bread cooks and rises.  See illustration below.   

Three strand braid, dip fingers in water and pinch tips of strands together.  Braid as shown.  Finish by dipping fingers in water again.  Pinch ends and tuck underneath.   

Place on a nonstick or lightly oiled cookie sheet dusted with course corn meal.  Just before placing in oven, brush top with water and liberally sprinkle with sesame seeds.  Baked until loaves are browned and sound hollow when tapped.  


Light and Easy Whole Wheat Loaves, Rounds, Rolls, and Perfect Pizza Dough

What makes my technique different is an unusually quick and simple two-step process.  Recipe first creates a soft batter assembled with only six ingredients, flour, water, yeast, salt, sugar, and a drizzle of olive oil. 

Only tools needed are a bowl, spatula, dough scraper, and cookie sheet.  Bread is table ready in about an hour and a half  from scratch.  

Ingredients:

Soft Batter
  • 2 rounded tablespoons instant dry yeast
  • 1/2 tablespoon sugar
  • 1rounded tablespoon kosher salt
  • 2 cups hot tap water
  • 1 cuo whole wheat flour
  • 2 cups whole wheat flour
  • 2 cups unbleached flour
  • Drizzle of olive oil
Forming
  • Additional 2 cups unblleached flour
  • Nonstick spray
  • Course cornmeal


Whisk yeast, sugar, and salt in a bowl.  Add hot tap water, whole wheat flour and first two cups of unbleached flour.  Drizzle with olive oil.  Soft batter is made by easily mixing by hand with a rubber spatula.  

When smooth, place a sheet of wax paper over top of bowl.  Cover with a moistened kitchen towel.  Place in a warm location.  Dough will double in size in less than 30 minutes.    

NOTE:  Dough can be formed into a variety of shapes including pizza.  For the first time I recommend forming into simple loaves. 

Spread about a cup and a half of reserved flour on counter.  Empty dough on top.  Scrape flour from the periphery over dough all around while kneading.  Add additional flour if needed for desired texture.  Keep folding, stretching, and kneading until dough is smooth.  Shape into a round or log.  Cut into 4 equal sized pieces. 

Spray cookie sheet with nonstick spray and sprinkle with course corn meal.  Place shaped dough on sheet.  Use a very sharp knife to make design slits.         

Instead of giving the formed loaves a second rise, try this technique.  Do not preheat the oven.  Set temperature to 420º direct heat, not convection.  Place an empty cookie sheet on the bottom shelf. 

For extra crispy bread, brush loaves with whisked egg white and water wash.  Place cookie sheet in the middle of the oven.  As the oven temperature increases to temperature setting, the dough will rise, and the empty bottom cookie sheet baffles direct heat preventing scourging.  Bread will be ready in about a half hour when the crust is nicely browned, crusted and the bread sounds hollow when tapped. 

Quick and Easy Whole Wheat Sourdough Bread

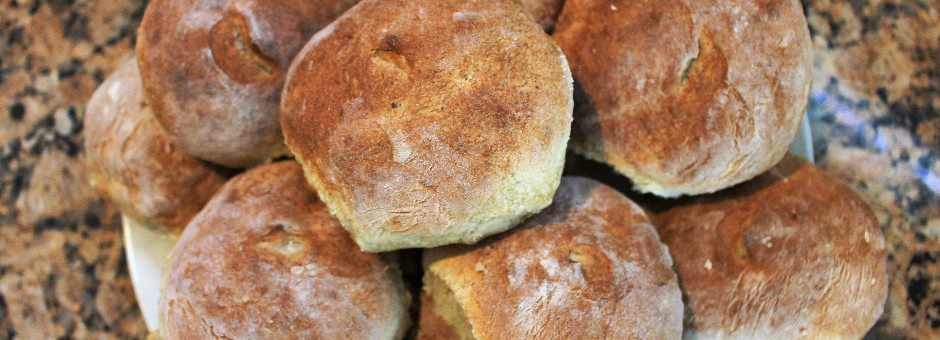
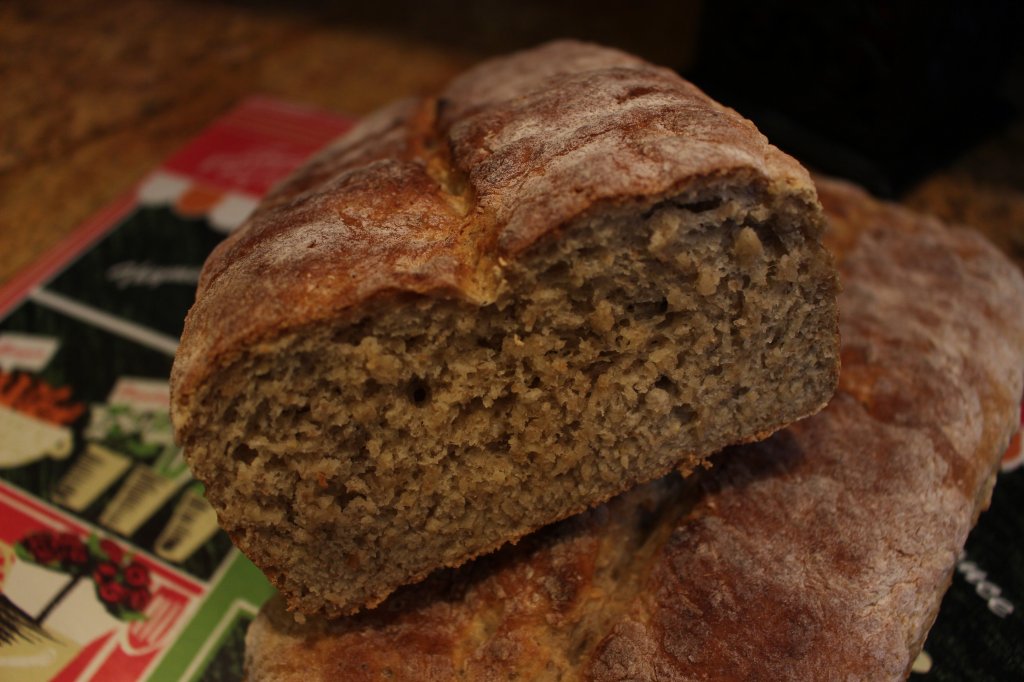
This version of my favorite “Quick and Easy Sourdough Bread” recipe replaces two cups of unbleached flour with whole wheat. 

Wheat flour is first moistened with olive oil in a large bowl.  One cup of the white flour is stirred with wheat.  Water, sugar, dry yeast, kosher salt, and sour dough are added and hand mixed with a spatula creating a relatively soft dough. 

Dough is covered and allowed to rise.  Once doubled in size, dough is kneaded with additional flour and formed to fit into 2 oiled and cornmeal dusted loaf pans, and oven ready.  Second rise isn’t needed.  Loafs can also be free formed into rolls, rounds, braids, or any other loafs.             

Finished loaf is crusty on the outside tender inside and doesn’t require brushing with water or egg wash before baking.          

Ingredients:

  • 2 cups whole wheat flour
  • ¼ cup olive oil
  • 3 cups of unbleached all-purpose separated, 1 and 2 cups. 
  • 2 cups hot tap water
  • 1 teaspoon sugar
  • 1 tablespoon instant dry yeast
  • 1 rounded tablespoon Kosher salt
  • 1/2 to 3/4 cup sourdough starter
  • Additional olive oil and course cornmeal

Place 2 cups whole wheat flour in a large bowl.  Drizzle with olive oil while folding into flour.  Mix in the cup white flour.   Add water, sugar, dry yeast, sour dough, and Kosher salt.  Combine well with a spatula.  Dough will be relatively light. 

Spray a sheet of wax paper with nonstick.  Gently place sprayed side of wax paper on dough.  

Drape top of bowl with a moist towel.  Rest in a warm location.   Preheat oven to 425° direct heat and position a rack vertically in the center.  Add an empty sheet on the lowest shelf as a baffle.   

Spread 1 ½ cup of remaining flour onto counter.  When dough doubles in size, about a 1/2-hour, empty dough onto flour.  With a dough scraper, fold flour from the periphery over dough all around while kneading.  Continue kneading until dough loses its stickiness and is uniform; incrementally adding remaining flour as needed.  Form into two logs.   

Coat 2 loaf pans with olive oil and sprinkle with course corn meal.  Place formed dough in pans.  With a sharp knife cut slits on dough.  Place in oven.  Bread will be ready when crusty and has a hollow sound when removed from pan and tappedin, about 30 minutes.    


Quick and Easy Semolina Bread
image-752029-IMG_5678_(3).jpg
image-752030-IMG_5682_(2).jpg
image-752031-IMG_5686_(2).jpg
image-752032-IMG_5700_(3).jpg
Semolina flour is best known for producing highest quality Italian pasta.  It’s high gluten content helps pasta retain shapes.  Semolina also is the main ingredient in Moroccan couscous and used in specialty deserts and breads. 
 
I became aware of semolina bread years ago when one of the large warehouse clubs carried fresh semolina loaves.  It was an instant favorite.  I especially enjoy its rich crust contrasted with it's delicate looking yet flavorful texture inside.  My goal was to create my semolina bread recipe modeled after my Quick and Easy Sourdough Bread discussed above.  
  
The ingredients and proportions I selected blended smooth and quickly by hand with he perfect light texture I was lookig for.  Rise, volume doubled in size in less than ½ hour.  My scraper folding technique with added flour followed by light kneading produced perfect texture.  Loaves were easily formed and retained their shape. 

Resulta, perfectly browned crust, great texture inside, interesting yellow tint, and flavorful.  From start to fully cooked loaves, was “breaking” bread only after an hour and a half total.   Wow, great semolina bread from scratch that quickly.                
Ingredients:
  • 2 cups hot tap water
  • 1 teaspoon sugar
  • 1 tablespoon instant dry yeast
  • 2 tablespoons olive oil
  • 1 rounded tablespoon Kosher salt
  • 2 cups semolina flour
  • 1 cup unbleached all-purpose flour
  • 1/2 to 3/4 cup sourdough starter
  • About 1 cup more semolina flour
  • ½ cup more unbleached all-purpose flour
Whisk water, sugar, and yeast in a bowl.  When proofing bubbles appear, incorporate olive oil, salt, sourdough, and flour with a kitchen spoon.  

Lightly cover with wax paper.  Drape top of bowl with a moist towel.  Let dough rise in a warm location until double in size, about ½ hour.  Meanwhile, preheat oven to 450° direct heat and position a rack vertically in the center.

Mix 1 cup of semolina and ½ cup all-purpose flour in a small bowl.  Spread on counter.  Remove wax paper and towel.  Empty dough from bowl onto flour.    

Using a dough scraper, fold periphery of dough over its center all.  Add additional flour until stickiness is gone and dough can be handled and formed.  Dough should still be a little softer than usual bread dough.
Kneed, cut, and form dough into 4 loaves.  Place on a cookie sheet or bread stone sprinkled with a small amount of cornmeal.

Cut diagonal slit pattern with a sharp knife or razor blade and bake immediately.  Loaves will rise again during baking; ready in about a half hour.


Rustic Boule Perfectly Baked in a Dutch Oven

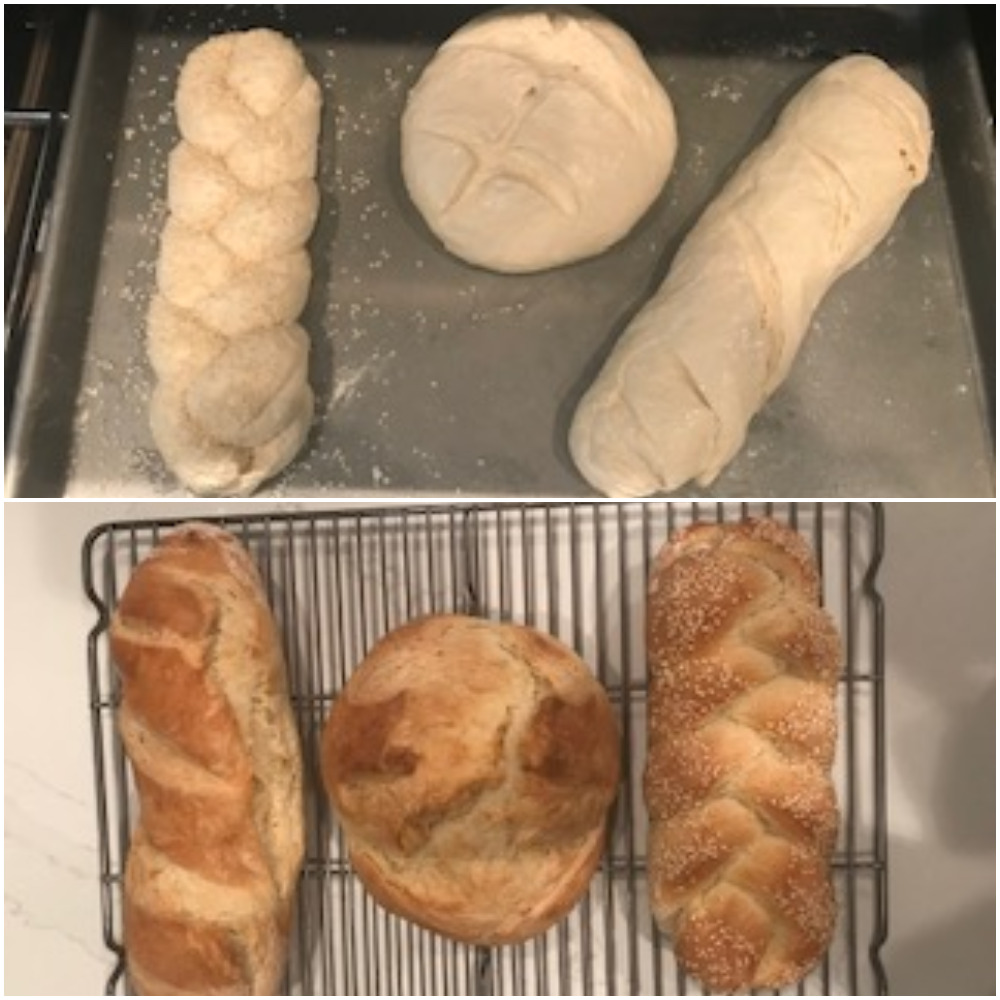
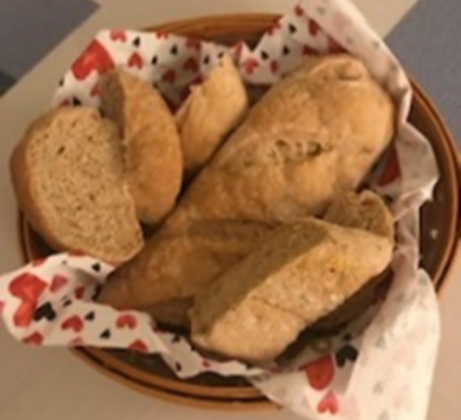
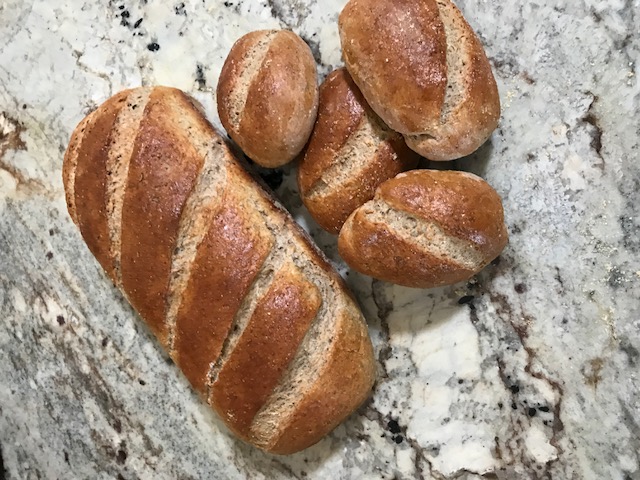
This flavorful bread is made with only five ingredients and is baked in a Dutch Oven.  Finished loaf is slightly grainy inside, with a medium firm texture, easy to slice, and makes great toast.  Tanned on the outside as shown results in perfectly crisped crust.

I wanted to create a delicious bread using the same simple ingredients as my “Basic Everyday Bread” but baked in a Dutch oven.  Assuming most casual bakers don’t have access to live sour dough starter, I also wanted a flavorful recipe that didn’t require it.  After several tweaks, the third using 400° direct heat cooked perfect in and out.         

Like all my other quick and easy bread recipes, first stage creates a light and thinner dough that’s exceptionally convenient to work with.  Once assembled, it’s easily mixed by hand in a bowl only with a spatula.  It also rises quickly, doubling its volume in under a half hour.       

Once risen remaining flour is incorporated with the dough, kneaded until smooth then formed into a ball.  Dough is placed in the Dutch oven lined with parchment.  ​​​​​​​

Ingredients:

  • 2 cups hot tap water
  • 1 teaspoon sugar
  • 1 tablespoon instant dry yeast
  • 1 rounded tablespoon Kosher salt
  • 3 plus 2 cups unbleached all-purpose flour

Utensils

  • Approx. 7-quart Dutch oven
  • Parchment paper 
  • Dough scraper
  • Sharp knife ​​​​​​​

Line bottom and sides of Dutch oven with parchment paper.  Roughly smooth creases.  Weight of the dough will hold parchment in place.    

Whisk water, sugar, instant yeast, and salt in a large bowl.  Add 3 cups of the flour.   Mix by hand with a spatula until smooth.  Loosely top with wax paper sprayed with nonstick facing dough.  Top with a towel moistened with warm water.  Place bowl in a warm location.

Preheat oven to 400° direct heat.         

Place remaining 2 cups of flour on working surface.  When dough doubles in size, empty onto flour.  With the aid of a dough scraper, combine and knead smooth.  Form into a ball.            

Place dough into the Dutch oven.  Score top of dough with a sharp knife or razor blade and place uncovered Dutch oven in the oven.     

Bread is ready when crust is crisp, about 30 to 40 minutes and bottom of bread sounds hollow when tapped. 


    ​​​​​​​

Rustic Multi Grain Sourdough Bread with Farro, Whole Wheat and Rye….
Remarkably Quick, Easy and Flavorful
Farro is an ancient hulled wheat that adds slightly nutty taste, chewy texture and remarkable flavors complementing whole wheat and rye.  Brown sugar and honey adds a touch of sweetness.  The biggest surprise, after farrow is precooked (simmered in water), yeast is proofed, ingredients are easily hand mixed, dough allowed to rise, texture adjusted, formed and baked; all in less than 2 hours total.

This is a hardy multigrain variation of my “Quick and Easy Sourdough Bread”, a technique I developed; “Quick and Easy Sourdough Bread” shown above.  Once proofed, remainder of the first set of ingredients creates a soft super moist dough that can easily be mixed by hand in a bowl with a kitchen spoon.  Once doubled, dough is inverted onto a counter on top of remaining unbleached flour.  Additional flour is incorporated by scraping under dough around its periphery, kneading over top to desirable texture; details below. 
              
As discussed under “Vegetables and Side Dishes”, Farrow, is a nutritious ancient grain popular in Europe and the Middle East.   It is high in anti-oxidants, fiber, and among the highest protein grain.  This version of Farro is abundantly harvested on the hillsides of Tuscany and Abruzzo.

Bread freezes well while retaining all its rich flavors.  
   
Ingredients:
  • ½ cup raw hulled Farro grains
  • 1 ½ cups water
  • 2 Tablespoons instant dry yeast
  • 2 ½ cups hot tap water
  • 1 Tablespoon honey
  • 1 Tablespoon dark brown sugar
  • 1 tablespoon Kosher salt
  • ½ cup sour dough starter
  • 1 cup whole wheat flour
  • ½ cup rye flour
  • 4 cups unbleached flour separated into 2 ½ cups and 1 ½ cups
Rinse Farro in a strainer.  Combine water and Farro in a pot and cover.  Bring to a simmer.  Farro is ready when water is absorbed and Farro is softened, about 40 minutes.

Mix hot water, yeast, honey and brown sugar in a bowl.  When yeast is proofed, top is mostly frothed, add cooked Farro, salt, sourdough starter, cup whole wheat flour, ½ cup rye flour, 2 ½ cups of unbleached flour. Cover with a sheet of wax paper coated with cooking spray on dough side.  Drape bowl with a moistened dish towel.  Place in a warm location until dough doubles in size, ½ hour or so.

Preheat oven 425° direct heat.

Spread remaining 1 ½ cups of flour on a counter or pastry board.  Place dough on flour.  With a dough scraper, fold dough and flour over dough’s top, kneading into dough until workable and just holds it.  If still a little too soft Add a little additional flour.  Form into a log and cut into four equal portions.  Form each into loaves. 

Place onto a cookie sheet with some corn meal or a light spray of cooking oil.  Place on the center shelf.  Bread will be cooked through in about 40 minutes when loaves are tanned and sounds hollow in their centers when tapped.  Cool slightly before cutting. 


Flavored Stuffed Breads
image-724773-IMG_4519_(2).jpg
My “Basic Everyday Bread” dough recipe above, makes a terrific base for a variety of flavored breads.  A quarter of the dough from recipe makes a foot-long stuffed bread roll about the diameter of a baguette; remainder of dough used to make French style loafs and rounds. 

Dough quarters are formed into rectangles, flavored with any combination of bold ingredients.  Examples are simple herb and roasted garlic, olive tapenade, muffuletta, sun dried or slow roasted tomato, prosciutto, different cheeses, sausage, caramelized onions, anchovies, herbs (basil, rosemary, sage), and so many more.  Added toppings can be applied thick for bold flavors or light for more subtle. 

Each of the suggested breads below begin with a layer of cheeses and sweet pot roasted garlic before applying various topping suggestions.   Dough is rolled, baked, and ready in about 30 minutes; absolutely delicious.  

Recipes below are for each foot-long stuffed bread. 
Ingredients:
  • ¼ dough from basic everyday bread recipe above
  • 5-6 garlic cloves from Pete’s Garlic Oil, recipe below
  • ¾ cup shredded Italian cheese blend
  • ½ cup shredded parmigiana cheese
Pete’s Garlic Oil
  • 5-6 large garlic cloves
  • 2-inch sprig fresh rosemary
  • 3-4 fresh sage leaves
  • Pinch red pepper flakes
  • ¼ teaspoon kosher salt
  • Olive Oil
Some additional topping suggestions
  • ¾ cup olive muffuletta; rosemary and sage from Pete’s Garlic Oil.
  • ¾ cup sun dried tomato in oil coarsely chopped; sliced fresh basil
  • 3 oz. shredded prosciutto or finely cubed; drizzle olive oil from Pete’s Garlic Oil
Garlic oil, remove rough tips and slice garlic in half lengthwise.  Place in a narrow stainless butter melting pot.  Add remaining ingredients and enough olive oil to generously cover contents.  Place over medium heat.  When oil begins to simmer, reduce heat to maintain a slow simmer.  Remove skins when released.  When garlic is richly tanned, soft, and sweet, garlic and oil are ready.

Form dough into a rectangle about 13 inches long by about 9 inched wide.

Mash garlic and dot dough surface evenly with a folk.  Spread with Italian shredded cheese followed by parmigiana.

Add one of the suggested additional toppings:
  • Spread olive muffuletta and coarsely chopped rosemary needles and sage from Garlic Oil.
  • Add sun dried tomato and sliced basil.
  • Add shredded or finely cubed prosciutto.  Lightly drizzle olive oil from Pete’s Garlic Oil
Roll a long side of dough towards the straighter edge.  Place seamed side down on a cookie sheet seam lined with parchment paper.  Score surface with a sharp knife or razor blade.  Brush with water.  Place in the middle of a preheated 425° direct heat oven.  

Bread is ready when browned, about 30 minutes.  Cool for 15 minutes before cutting.    
Oatmeal Rye Bread
Quick and Delicious
This bread was developed almost by accident.  I was out of homemade bread and only had scraps of leftover ingredients.  Remembering my traditional core bread recipe proportions, 6 cups flour, 2 1/2 cups water, 2 tablespoons instant dry yeast, and a tablespoon each salt and sugar, I raided the cupboard to see what I could come up. Hopefully something great (well, at least good).

I raided the cupboard to see what I could come up with.  By surprise, the combination of oatmeal, whole grain rye and unbleached wheat flour with a hint of sweetness from light brown sugar and honey added proved to be pretty good.

By surprise, the combination of oatmeal, whole grain rye and unbleached wheat flour with hints of sweetness from light brown sugar and honey proved to be more than pretty good. 

Here it is, recipe refined, ingredients measured, tweaked, procedures documented and tested.

Bakers generally believe the longer dough takes to rise, the more complex its flavors; 3 1/2 to 4 hours isn't excessive.  These loaves rise in only an hour or two but will not disappoint.  Finished loaves have wonderfully complex flavors, great texture and crumb.
    
Ingredients:
  • 3 ½ cups boiling water
  • 2 cups rolled oats
  • 1 ½ tablespoon light brown sugar
  • 2 ½ tablespoons active dry yeast
  • 1 ½ tablespoons salt
  • 2 tablespoons honey
  • 3 tablespoons olive oil
  • 1 cup rye flour
  • 3-4 cups unbleached all-purpose flour    
  • More flour as needed
  • 2 Loaf pans approx. 5”x10”  
Add oats and boiling water into mixer with a dough hook.  Combine for about a minute.  When water cools to 120 degrees or less, mix in the yeast, salt, light brown sugar, honey, and olive oil.  Add rye flour and knead.  Gradually add the unbleached wheat flour while continuing to knead until the dough is uniform and begins to firm a ball.  Dough is ready when pulling away from the bowl but remain slightly sticky on the bottom. 

Empty the mix onto a floured countertop.  Hand kneads for a few more minutes until smooth.  Return to the bowl, cover with wax paper and a damp towel and place in a worm location to rise.

When dough doubles in size, in as little as an hour or two, place dough back on the floured countertop.  Punch the dough down and form it again into a ball.  Divide the dough to fill loaf pans about halfway.  This recipe will make two large loaves.   

Spray pans with non-stick oil and press the dough to the bottom of the pans.  After resting them for about 5 minutes, place loaf pans on a rack in the middle of a cold oven.  Also place an empty cookie sheet on a lower rack.  Turn direct heat onto 420 degrees°, not convection.  Bread will rise about double and will cook through in about 30 to 40 minutes.  Bread is ready when they sound hollow when tapped.  Cool slightly before cutting.


Potato Bread
Perfect for Rolls, Buns and Sliced Sandwich Bread  
Potatoes as an ingredient in bread isn’t as strange as it might seem. Potatoes help make wheat breads lighter and softer.  Potato also results in a moister loaf with longer shelf Life. 

This simple recipe for potato breads are perfect for sandwiches.  Store bought burger buns, rolls and sliced white sandwich breads lack texture, are short on flavor and are fragile when wet.  This recipe produces a denser bread that absorbs natural juices, supports condiments without breaking apart, has great taste that compliment, not distract what’s inside, and still offers a clean bite.

No other bread pairs as well with my double burgers seared on all sides with melted cheese in the middle while all natural juices are embedded in my bread.  Life's simplest pleasures!         
Ingredients:
  • 1 medium-large russet potato peeled (about 1 1/4 cups cooked)
  • Water
  • 2 tablespoons dry yeast
  • 1 tablespoon salt
  • 1 tablespoon sugar
  • About 6 cups unbleached wheat flour
Peel and thick slice the potato.  Place in a small pot with about 2 ½ cups of water.  Boil until potatoes are softened through.  Strain potato over the pot retaining all cooking water.  Remove potato and cool.

Spray the inside of the mixer and dough hook with cooking spray. 
  
Replenish evaporated water back into the pot, having a combined total of 2 ½ cups.  Place water in the mixer.  When the water temperature drops below 120º mix in the yeast, salt and sugar.  Knead the cooled potato and a cup of flour in the mixer with the dough hook.  Continue adding flour until the dough starts to pull away from the sides.  A ball will begin to form but the bottom will remain sticky.

Remove the dough to a floured counter and hand knead adding more flour as needed.  The dough will be softer than traditional bread dough. 

Place the dough in a bowl.  Cover with wax paper or plastic wrap then with a lightly moist towel.  Place in a worm location.  When dough doubles in size, an hour or two, hand knead again then form into loaves, rounds and/or sandwich size buns. 

Place them in an unheated oven on cookie sheets or a stone lightly coated with corn meal in the middle of the oven.  If using cookie sheets, place another cookie sheet on the lowest tray as a baffle.  Set oven to 400º direct heat.  Bread will be ready in about 30 to 40 minutes or more pending shape.


Southern Biscuit Dinner Rolls and Logs  

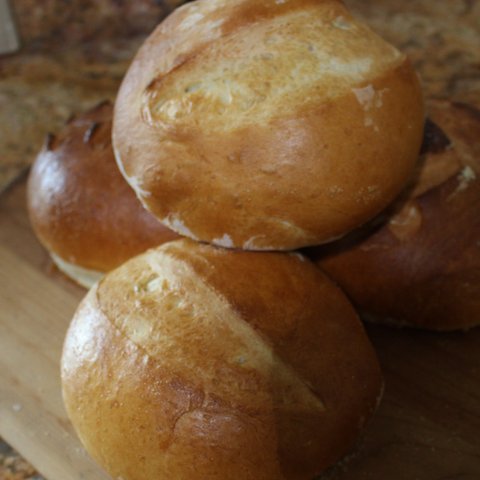
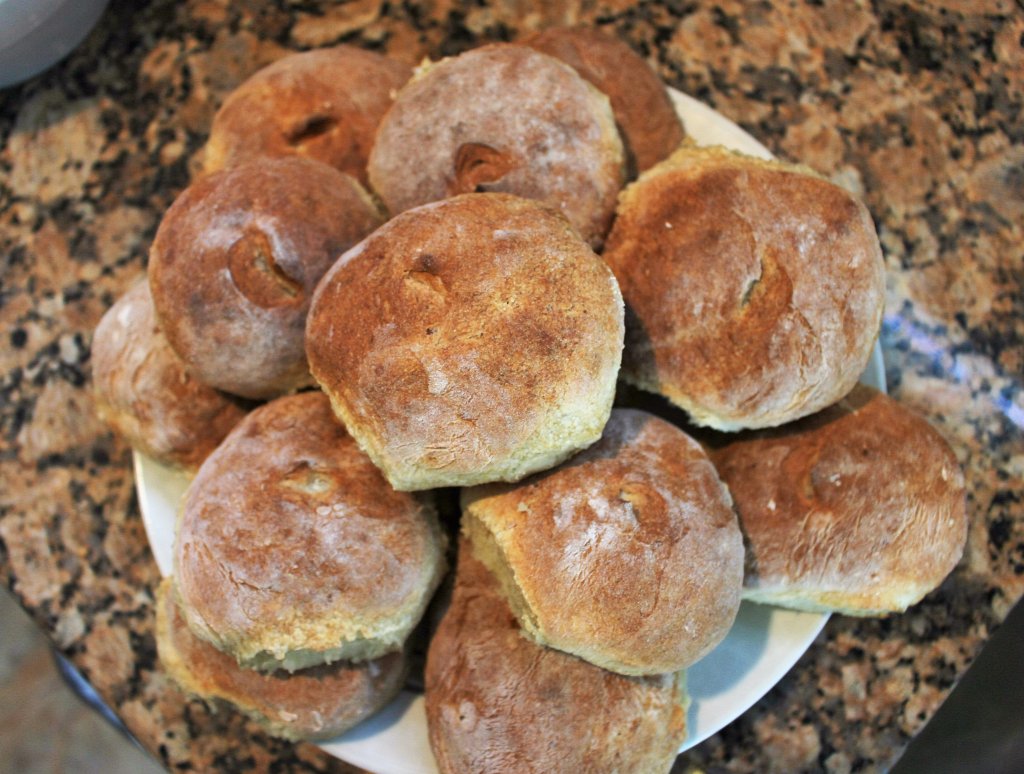
Dinner rolls are made with southern style biscuit batter conveniently mixed in a food processor or mixer with dough hook.  Once combined, formed into a log on a counter dusted with flour, shaped and baked. 

Dry Ingredients:

  • 3-cups flour
  • 1 scant tablespoon Kosher salt
  • 1 tablespoon baking powder
  • 1/2 teaspoon cream of tarter

Creamed Butter:

  • 1 stick unsalted butter
  • 1 ½ tablespoon sugar

Buttermilk:

  • 1 ½ cups buttermilk
  • 1 teaspoon baking soda

Preheat oven to 450°

Whisk “Dry Ingredient” in a bowl.

Cream butter and sugar in food processor.

Add dry ingredients and pulsate until combined.

Pour in buttermilk and baking soda.  Mix until smooth.  Batter will be sticky.

Dust counter with flour.  Remove batter with a spatula and place on flour.  Flip with a pastry scraper to dust all sides.  With fingers form into a log.  Cut pieces with scrapers, roll in flour and form into balls or football shapes in hand.       

Place in a cookie sheet lined with ungreased parchment or nonstick foil.  Bake until lightly tanned about 10 minutes or so.   

Optional, lightly brush tops with melted butter before baking.  Surfaces will be softer, cooking times slightly longer.      ​​​​​​​


Southern Cheddar Cheese Biscuit Rolls

Makes about a dozen biscuits.   

Follow recipe above.  After mixing buttermilk and baking soda, pulsate with 2 cups of shredded cheddar.  If needed, thin with additional buttermilk.

Continue with instructions above for shaping and baking.    


​​​​​​​

Rye Bread
Free Form or Loaf Pan Baked
Rye Breads can be made with a range of textures and flavor tones.  Landbrot is the Country style Rye Bread of Germany.  Its name translates to “Bread of the Land”.  The French have a hardy Rye Bread formed into baguette and as we all know; New Yorkers have their own version that includes caraway seeds.  Below I also have my recipe for Potato Rye Bread, again with a unique texture.

This rye bread is very flavorful.  Pan loaves and free formed are perfect for sandwich and for bread baskets.  
      
As with several other bread recipes, James Beard influenced this recipe.  Throughout the years I’ve made some modifications.  Mine is a little sweeter, more yeast makes it a little lighter with quicker rise time, and assembly a little easier.

With these proportions, dough can be made into free formed loaves, baked in two 4” x 8” loaf pans.  Pictured above, loaf was made in a 5” x 11” pan; remainder hand formed.
Ingredients:
  • 1 cup hot tap water
  • 1 cup warmed whole milk
  • 2 tablespoon instant dry yeast
  • ¼ cup honey
  • 2 tablespoons butter softened or melted
  • 1 tablespoon caraway seeds
  • 1 heaping tablespoon salt
  • 2 ½ cup rye flour
  • 2 ½ to 3 cup unbleached wheat flour
Egg wash
  • One egg white
  • 2 tablespoons water
In a mixer with dough hook (or large bowl if mixing by hand), add water, milk, yeast, honey, and caraway seeds.  Whisk for a couple of minutes.  Relax mixture for another couple of minutes.  Add salt and 1st cup rye flour; mix.  Gradually kneed with remaining rye flour. 

Add first two cups of unbleached flour in mixer kneading a little at a time.  Slowly add more until dough starts releasing from sides.  Bottom should still be sticky.  Using as little flour as needed will produce moister bread.  Remove dough to a floured counter.  Hand shape dough into a ball and place into a bowl.  Cover top with plastic wrap and a moistened towel over bowl.  Place in a warm location.

Butter loaf pan(s) or cookie sheet if making free formed.  Sprinkle with corn flour and shake out excess.

When dough doubles in size, return to floured counter and give dough a final kneed.  If using smaller pans, divide dough in half and form both halves into logs the length of the pans and insert.  If using the larger pan, form about 2/3rd into a log; the remaining dough into free formed rolls.  Place free formed loaves on the buttered cookie sheet.

Allow dough to partly rise again while preheating oven to 400° direct heat.  Place an empty cookie sheet as a baffle on the bottom oven tray. 

Using a very sharp knife or razor blade, score tops to your preferred pattern. Place tray/loaf pans in oven.  Loaves will be ready when nicely browned, about 40 minutes.  Test by tapping on their bottoms.  They should sound hollow when tapped.  Wait until bread mostly cools but is still warm before cutting.  Freeze any bread that won’t be eaten within a day or two.   


Potato Rye Bread
Potatoes added to breads is not unusual as it may seem.  Potatoes help breads retain more moisture, makes them lighter and help increases shelf life. 

Rye flour has less gluten, proteins found in bread, than wheat.  Gluten is what makes bread sticky.  Rye tends to produce heavier and denser breads.  Potatoes added help lighten rye breads and wet helps compensate for gluten consistency and Proportions are important.

This recipe produces a lighter rye bread and makes terrific toast.  It can be made in a loaf pans or free formed.  If making them into larger rounds like the picture shown, make sure you add enough wheat to give it sufficient substance.

Even with potatoes, breads without preservatives have relative shorter shelf lives.  Once cooled consider storing portion sizes in the freezer.                        
Ingredients:
  • Russet potatoes, enough to yield 1 cup mashed
  • Water
  • 1 cup buttermilk at room temperature
  • 3 tablespoons melted butter
  • 3 Tablespoons honey
  • 1 Tablespoon caraway seeds
  • 1 Generous tablespoon salt
  • 2 tablespoons yeast
  • 2 ½ cups rye flour
  • 3 ½ cups unbleached all-purpose flour
Spray inside of mixing bowl and hook with nonstick spray.  Mix buttermilk, honey, caraway seeds and salt in the mixing bowl.  

Peel and thick slice potatoes.  Place in a small pot with about 2 cups of water.  Boil until potatoes are softened through.  Remove potatoes with a slotted spoon; do not discard water.  Mash potato.        

Stir 1 cup of the warm potato water with the buttermilk mixture.  Add and whisk in yeast.  If unsure of yeast quality, proof. 

Using a dough hook, gradually add rye flour and 1 cup of mashed potato.  Gradually add unbleached flour until a ball begins to form but the bottom remains sticky. 

Remove the dough to a generously floured counter and hand knead adding more flour as needed.  The dough will be slightly softer than traditional bread dough.  Cover with wax paper or plastic wrap then with a moist towel.  Place In a warm location until dough doubles in size, about an hour. 

Hand knead again on a flowered surface.  Form into loaves or rounds or place in bread loaf pans.  Place loaf pans in an unheated oven or free forms loaves on a cookie sheet coated with corn meal.  Place another cookie sheet on the lowest tray as a baffle.  Set oven to 400º direct heat.  When temperature is reached, place a few ice cubes in the baffle tray.  Steam created will help crisp bread. 

Bread will be ready in about 30 to 40 minutes or more pending shape.